Free Tech Pack Template for Clothing Brands
A tech pack template three ways: a three-page PDF to print, an Excel file to type straight into, or a form you fill in on this page and save as a PDF. Free, no email required, and yours to use with any factory.
A tech pack is the single document that turns your idea into something a factory can actually make, and it is the difference between a first sample that is close and one that is completely off. This template gives you every section in the right order. Fill in what you know, leave the rest blank, and send it with your enquiry.
This one comes from the factory’s side of the exchange: we are a clothing manufacturer in Bangladesh and we read these documents every week. That shaped what is in it, and it is why the page ends with six things that go wrong when a tech pack arrives, not with what a tech pack is in theory.
What the template looks like
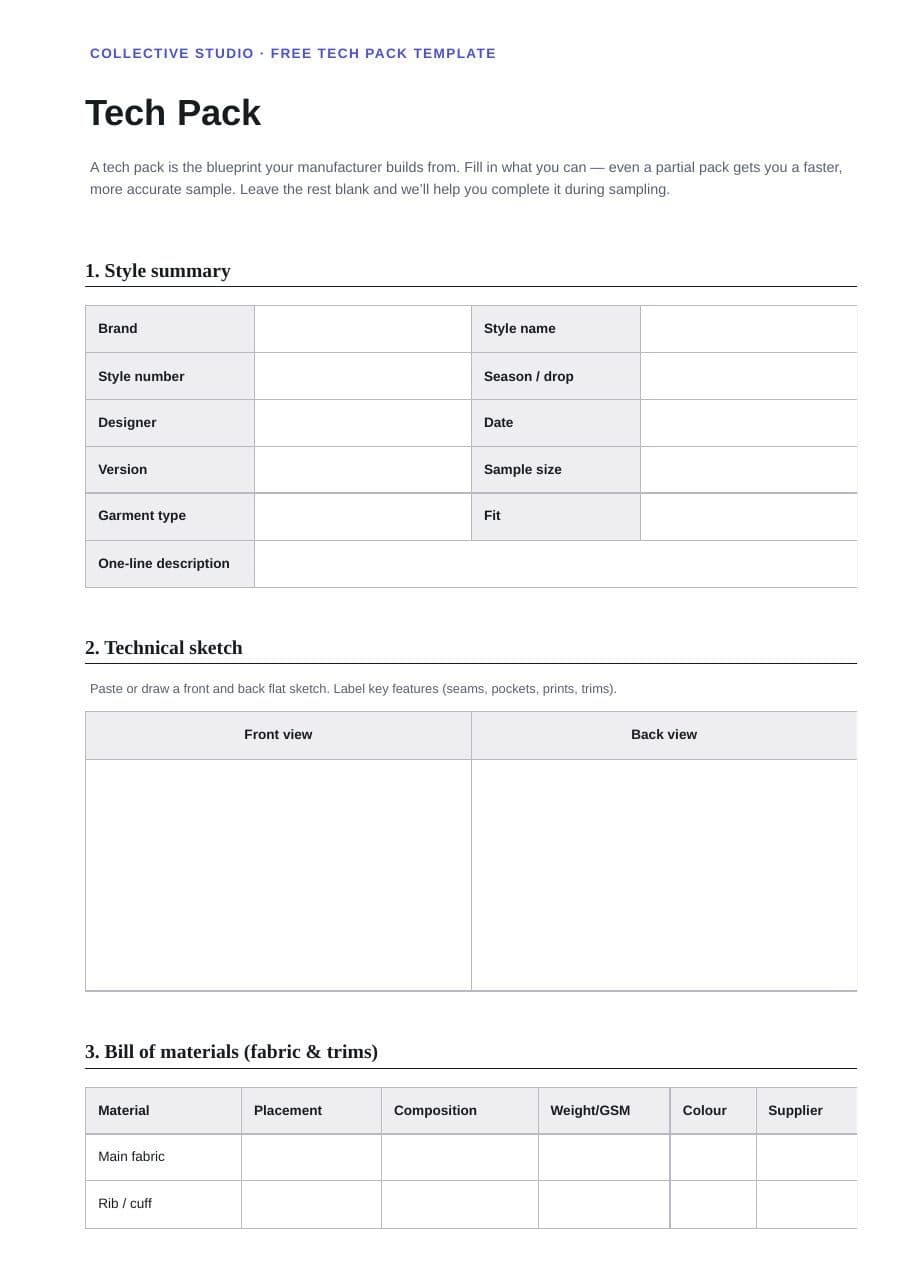
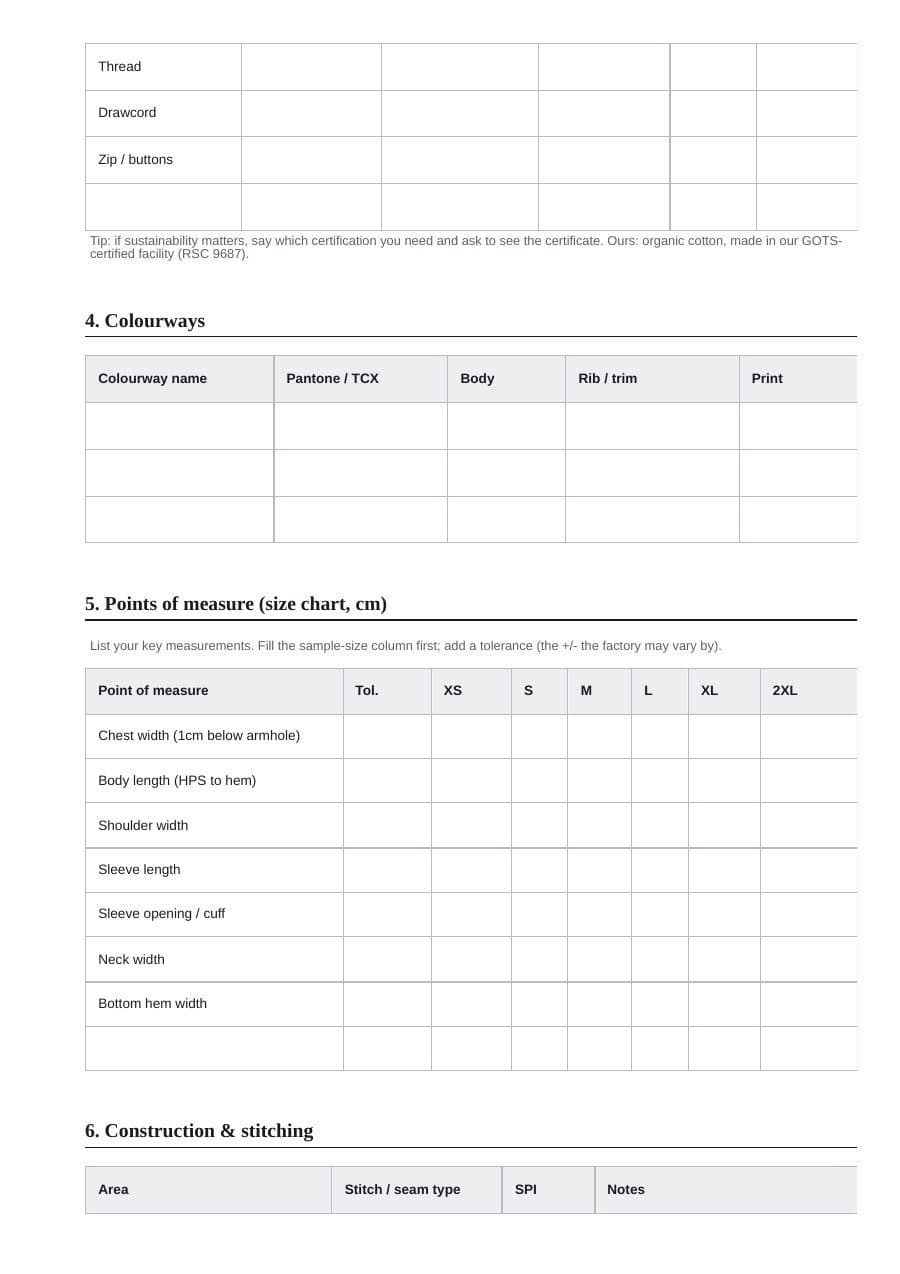
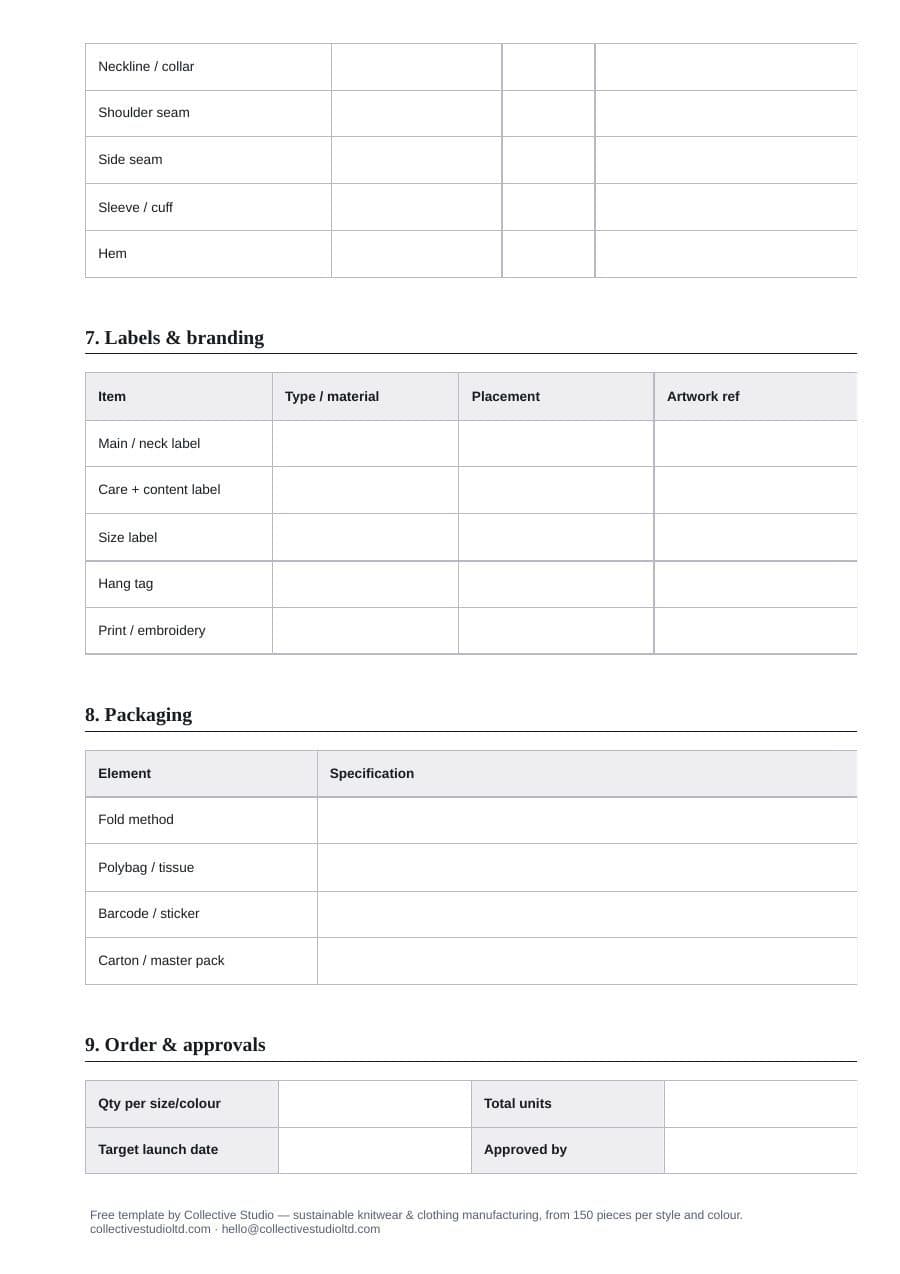
Three A4 pages, shown here in full. No email gate, and nothing hidden behind a form.
Fill in the tech pack template online
Would you rather not download anything? Fill the template in here. Pick a garment and the form opens with that garment’s points of measure and rows, either empty or with our worked example in every box. When you are done, save it as a PDF, or download a CSV file that opens in Excel and Google Sheets.
- The same nine sections as the PDF and Excel versions, in the same order.
- Add or remove rows, rename the sizes, and add a front and a back sketch as pictures.
- Type one measurement in your sample size and a grade, and it works out the other sizes.
- The order grid adds up each colour and the whole order.
- Your draft is kept in your own browser, so you can close the page and carry on later. Nothing is uploaded.
2. Choose how to start
Free, with no sign-up. What you type stays in your browser and is not sent to us or anyone else.
What is inside the template
Our free tech pack template is a three-page A4 PDF and a matching Excel workbook, both with the same nine sections: style summary, technical sketch, bill of materials, colourways, points of measure, construction and stitching, labels and branding, packaging, and order and approvals. The Excel file adds two helper sheets, for order quantities and size grading.
| Section | Where | What you fill in |
|---|---|---|
| 1. Style summary | PDF page 1 | Brand, style name, style number, season or drop, designer, date, version, sample size, garment type, fit and a one-line description |
| 2. Technical sketch | PDF page 1 | A front view and a back view, drawn or pasted as flats |
| 3. Bill of materials | PDF pages 1 to 2 | One row per fabric and trim (main fabric, rib or cuff, thread, drawcord, zip or buttons, plus a spare row): placement, composition, weight in GSM, colour and supplier |
| 4. Colourways | PDF page 2 | Colourway name, Pantone or TCX reference, and the colour of the body, the rib or trim, and the print |
| 5. Points of measure | PDF page 2 | Seven points of measure plus a spare row, a tolerance for each, and sizes XS to 2XL in centimetres |
| 6. Construction and stitching | PDF pages 2 to 3 | Neckline, shoulder seam, side seam, sleeve or cuff, and hem: stitch or seam type, SPI and notes |
| 7. Labels and branding | PDF page 3 | Main or neck label, care and content label, size label, hang tag, and print or embroidery: type, placement and artwork reference |
| 8. Packaging | PDF page 3 | Fold method, polybag or tissue, barcode or sticker, and carton or master pack |
| 9. Order and approvals | PDF page 3 | Quantity per size and colour, total units, target launch date, and who approved this version |
| Quantities | Excel only, sheet 2 | A colour-by-size grid, up to six colours and eight sizes, that totals the order and turns any colour under 150 pieces red |
| Grading | Excel only, sheet 3 | Your base-size measurement and the grade for up to ten points of measure; it works out every other size |
The nine sections by PDF page. The Excel file holds all nine on its first sheet, Tech Pack, followed by the Quantities and Grading sheets.
The PDF is set up for A4 paper. If you print on US Letter, chooseFit to page in the print dialogue (some readers call it Shrink oversized pages) so the bottom of each page is not cut off. The Excel file is set to A4 as well: change the paper size under Page Layout before you print it.
Seven free templates: pick yours
| Template | Points of measure | Sizes | Formats |
|---|---|---|---|
| General (this page), any garment | 7 | XS–2XL | PDF · Excel |
| T-shirt | 13, incl. neck drop and neckband | XS–2XL | PDF · Excel |
| Hoodie | 14, incl. hood, cuff, waistband, pocket | XS–2XL | PDF · Excel |
| Jogger | 13, incl. rise, inseam, cuff | XS–2XL | PDF · Excel |
| Sweatshirt | 14, incl. neck, cuff and hem rib | XS–2XL | PDF · Excel |
| Polo shirt | 16, incl. collar, placket, vents | XS–2XL | PDF · Excel |
| Shorts | 15, incl. rise, inseam, pockets | XS–2XL | PDF · Excel |
Each of the seven can also be filled in on this page: choose the garment in the online form above.
Video: how to fill it in
A 68-second walkthrough of the template, one section at a time, with the one line that matters most for each. It ends on the filled-in Excel example.
The Excel version, with a filled-in example
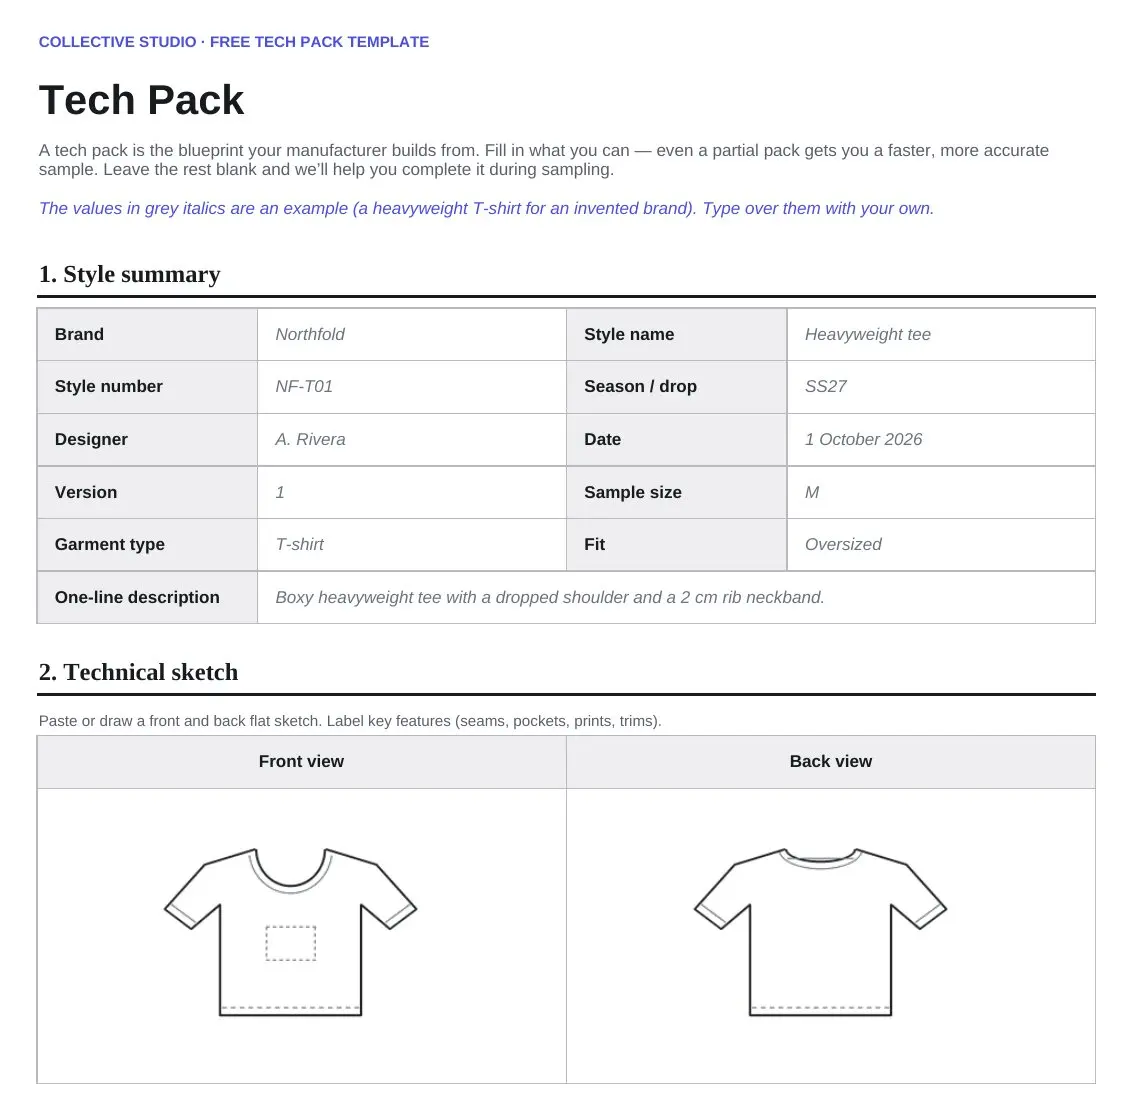
Prefer to type? The Excel file opens on the same template as the PDF, section for section, laid out the same way on its first sheet. The difference is that every box already holds an example value in grey italics: a complete tech pack for an invented brand’s heavyweight T-shirt, with an example front and back sketch. Read it to see what belongs in each box, then type over it with your own details.
Two more sheets do the arithmetic. Quantities is a colour-by-size grid, up to six colours and eight sizes you can rename, that adds up each colour, each size and the whole order, and turns a colour red if it comes to fewer than 150 pieces, our minimum per style and colour. Its grand total fills in Total units on the first sheet. Grading takes the measurement in your base size and the grade (how much it grows per size) for up to ten points of measure, and works out every other size. Fabric type, units and base size are drop-downs, and the formula cells are locked so a total cannot be typed over by accident.
Using the template in Google Sheets
No Excel? The same file works in Google Sheets. Google’s help page says you can edit, download and convert Microsoft Office files in Sheets, and that double-clicking an Office file in Google Drive opens it there. Download the Excel version, upload it to Google Drive with New, then File upload, and double-click it. To keep a Google Sheets copy, use File, then Save as Google Sheets. Every section and every example value comes across as cells you can type over. Check two things after it opens: that the column widths still fit your text, and that the example front and back sketches are where you expect them, since drawings do not always land in exactly the same place. To send it to a factory, use File, Download, and pick PDF or Excel.
T-shirt tech pack example
This is what a finished tech pack looks like: the template filled in for one garment, an oversized heavyweight T-shirt in 240 GSM combed cotton jersey, in two colours. Each picture is one part of the pack, with the values written in blue and a short note on what the factory reads there. The brand and the numbers are invented to show the level of detail. Select a picture to see it full size.
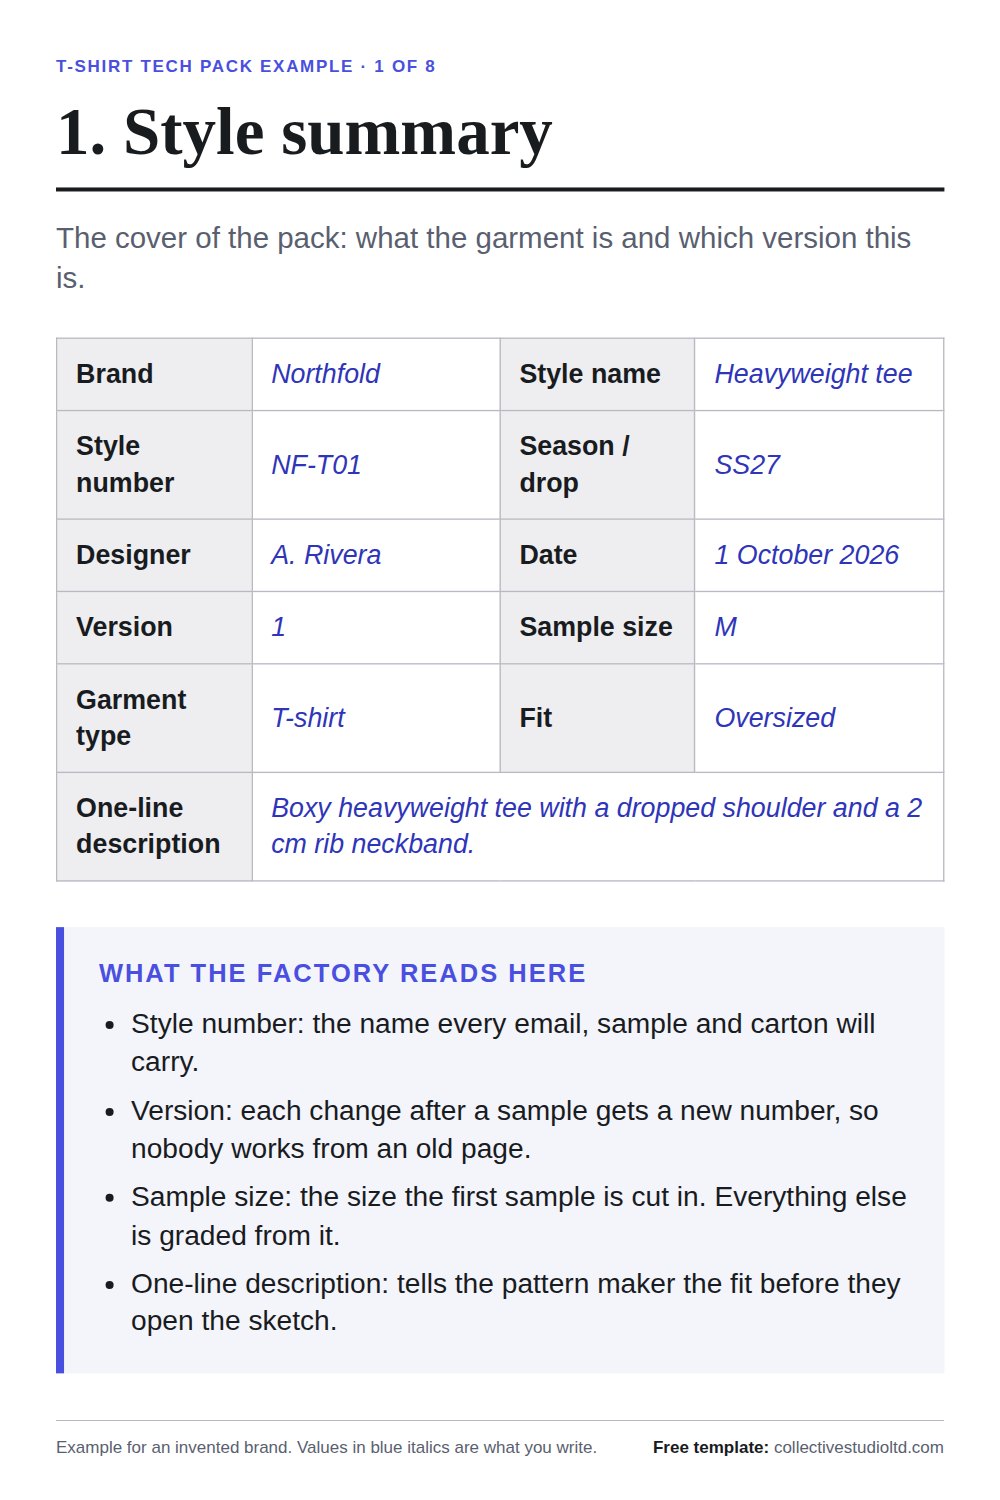
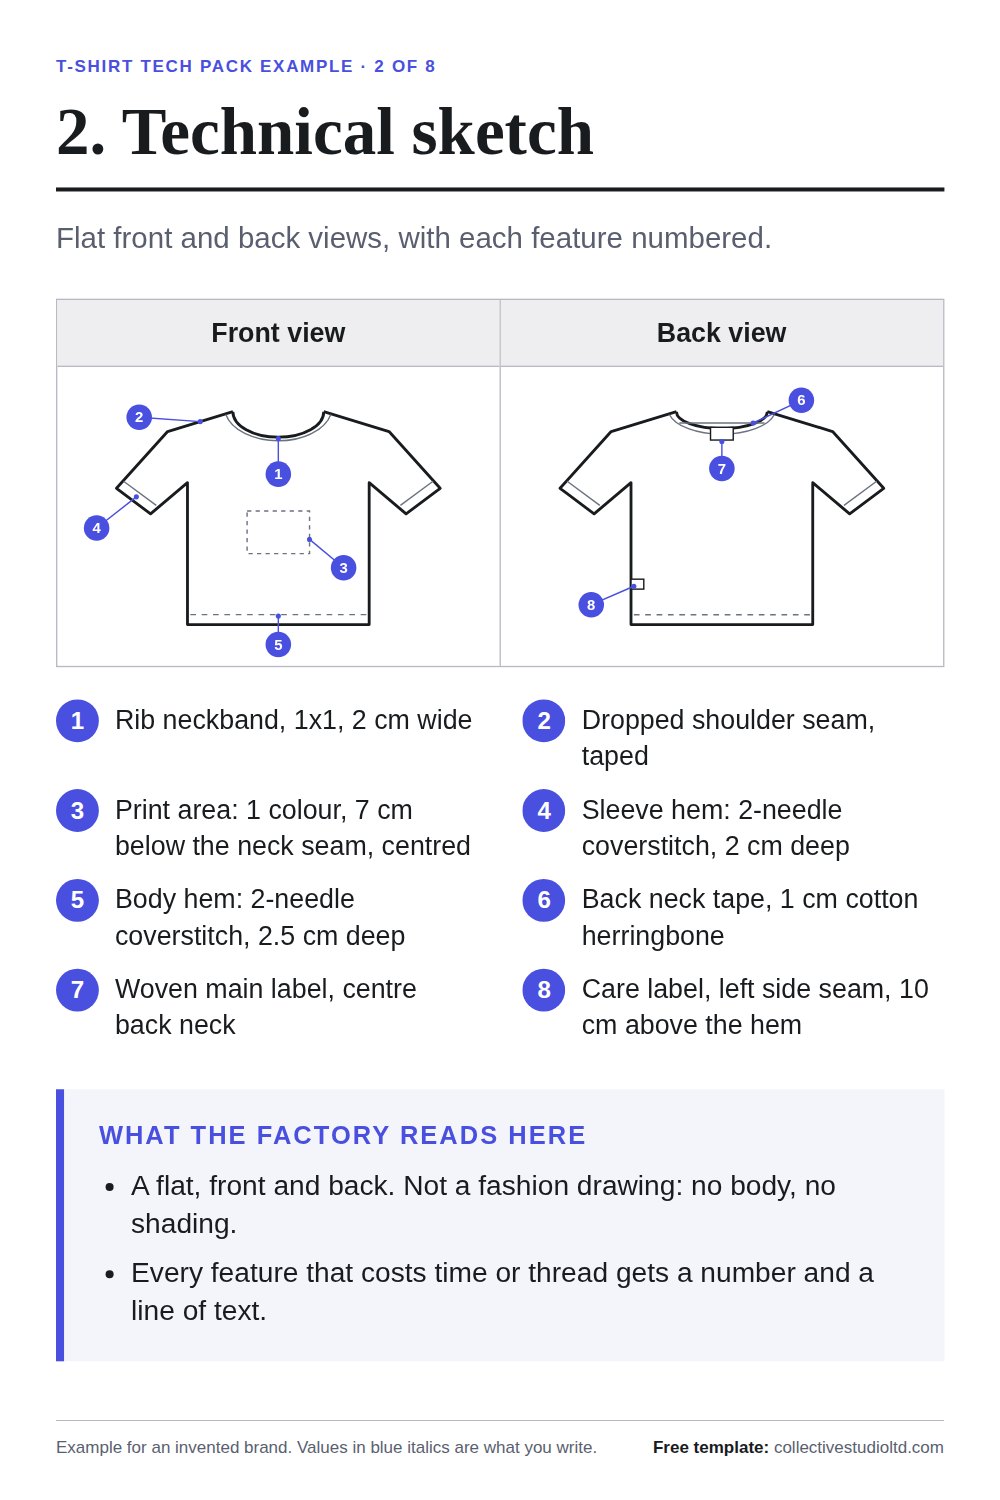
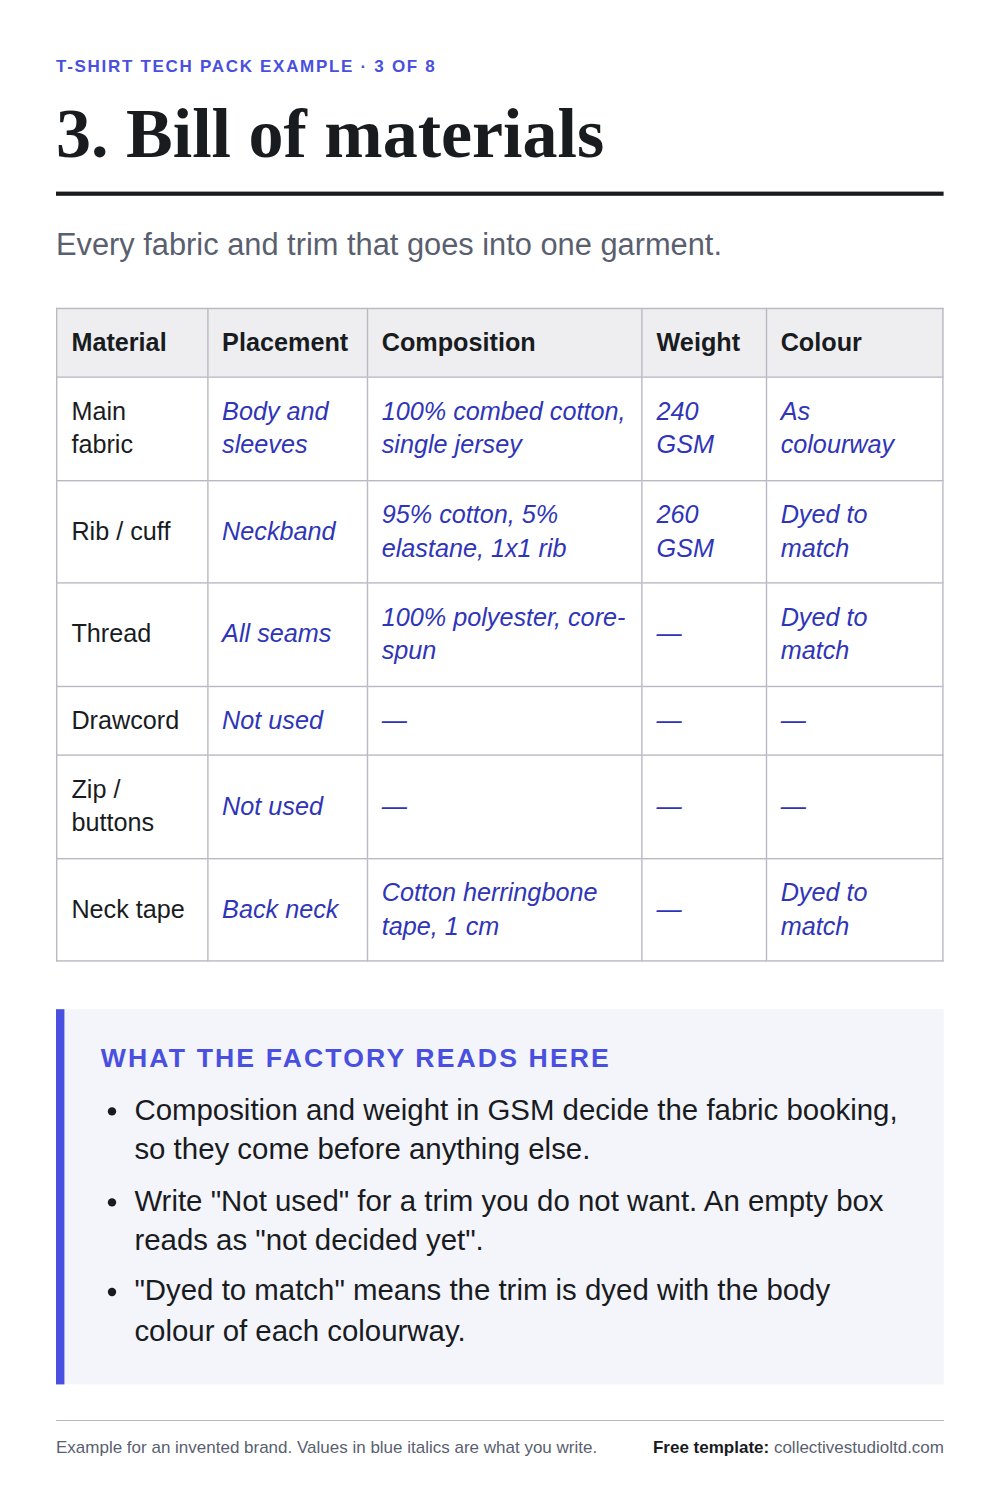
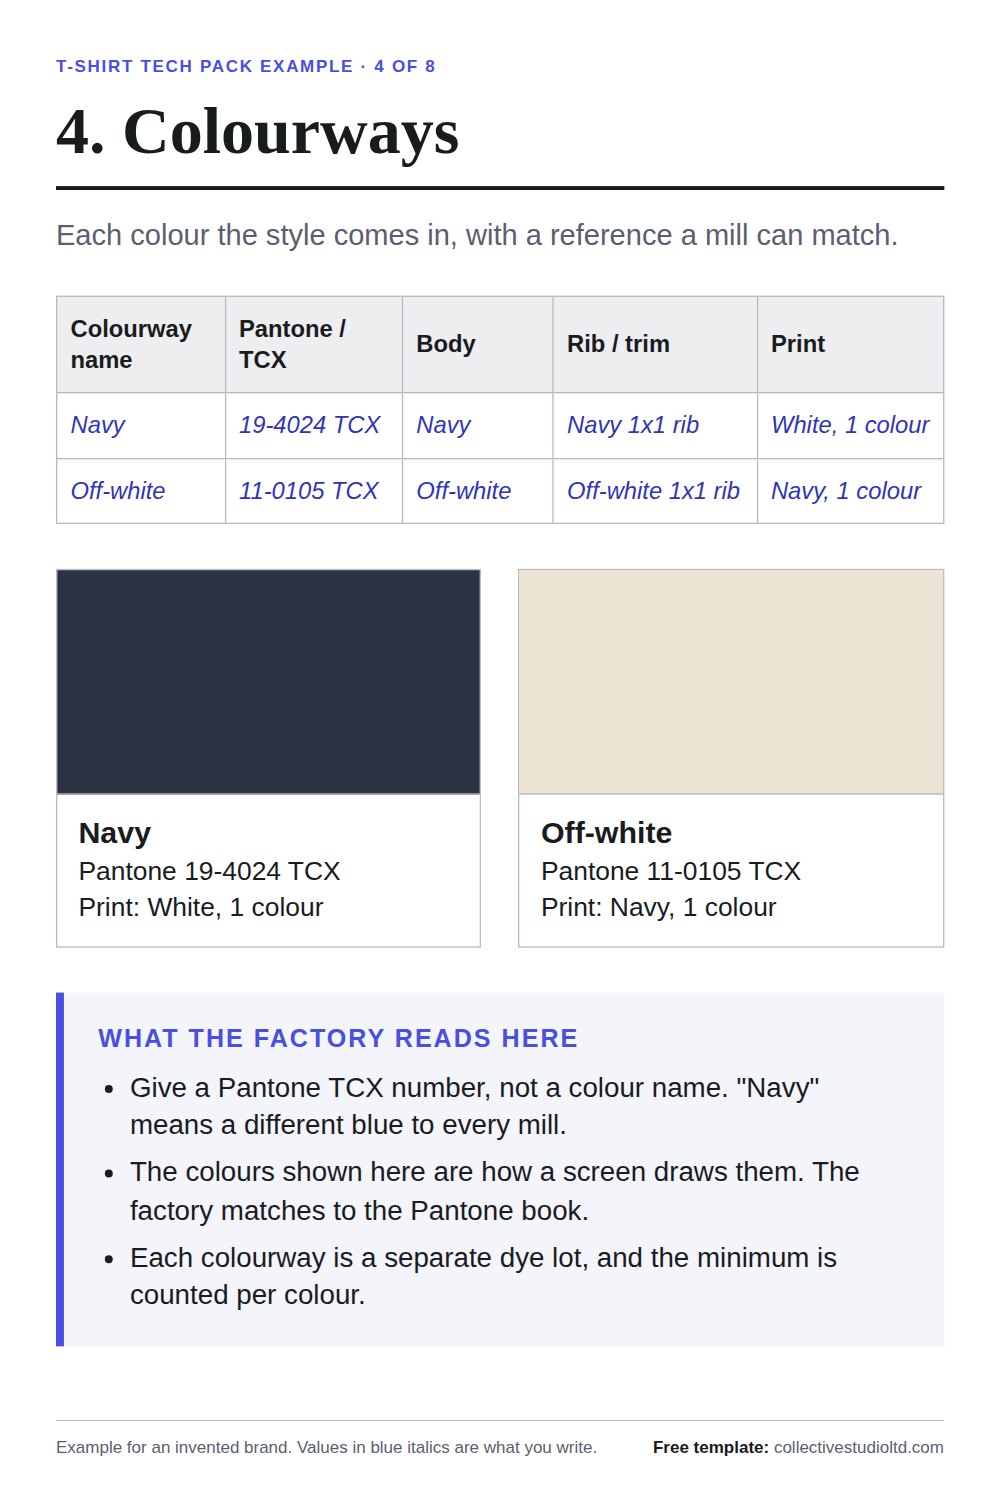
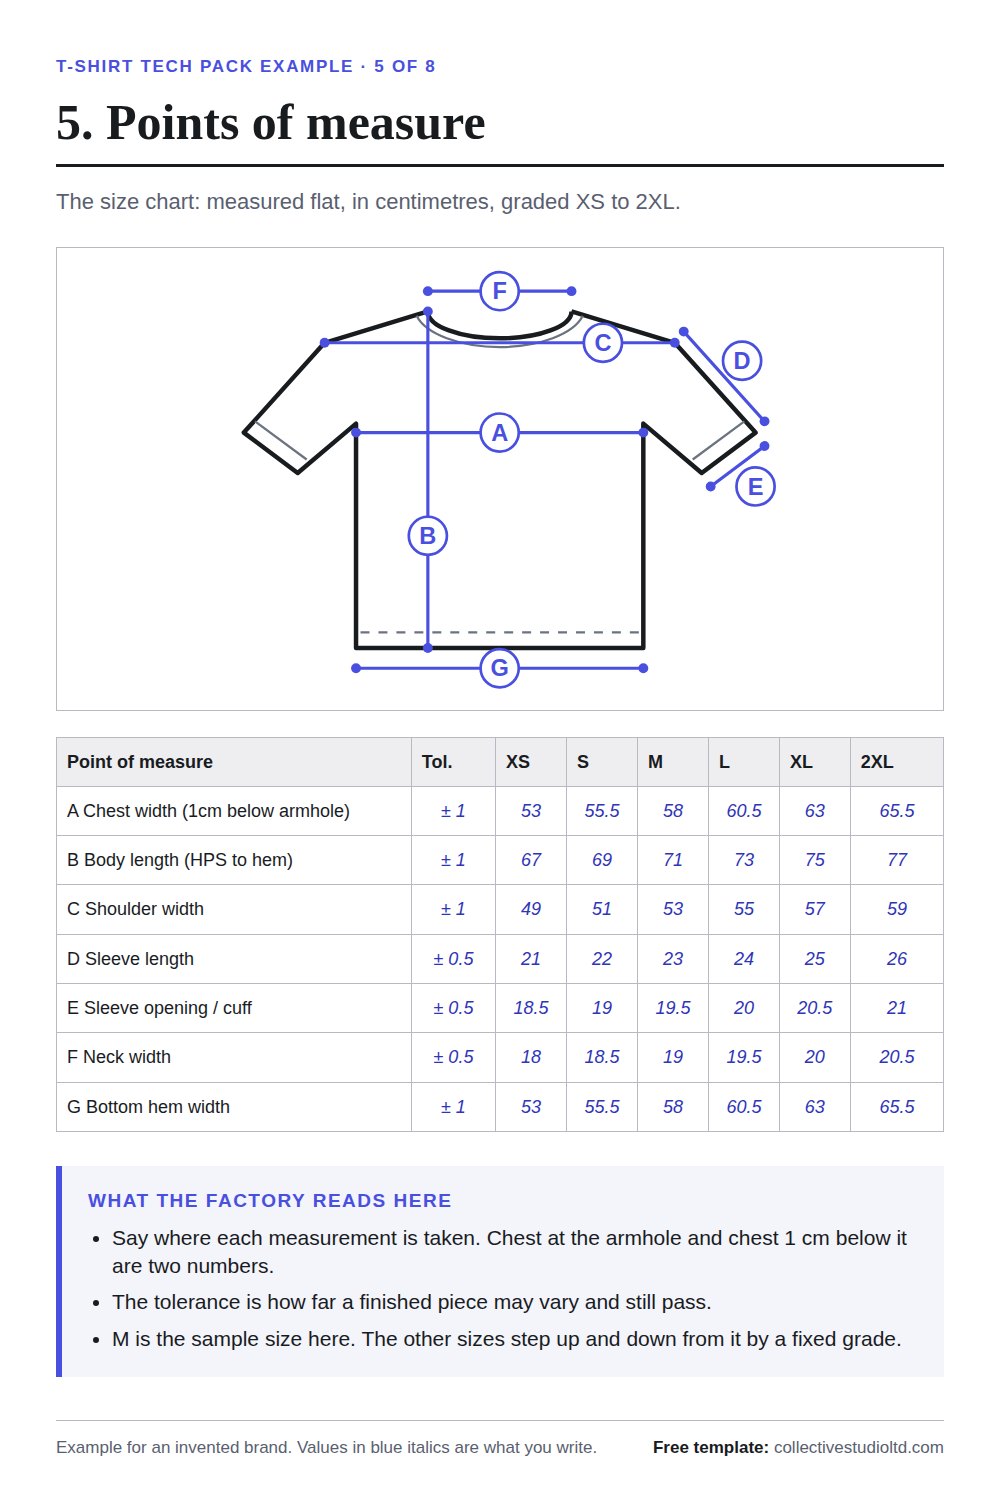
The same values are in the Excel version, ready to type over. Below is the part of the example a factory reads most closely: the points of measure, graded from XS to 2XL. Measure a garment you like and use your own numbers.
| Point of measure | Tol. (+/-) | XS | S | M | L | XL | 2XL |
|---|---|---|---|---|---|---|---|
| Chest width (1 cm below armhole) | 1 | 53 | 55.5 | 58 | 60.5 | 63 | 65.5 |
| Body length (HPS to hem) | 1 | 67 | 69 | 71 | 73 | 75 | 77 |
| Shoulder width | 1 | 49 | 51 | 53 | 55 | 57 | 59 |
| Sleeve length | 0.5 | 21 | 22 | 23 | 24 | 25 | 26 |
| Sleeve opening / cuff | 0.5 | 18.5 | 19 | 19.5 | 20 | 20.5 | 21 |
| Neck width | 0.5 | 18 | 18.5 | 19 | 19.5 | 20 | 20.5 |
| Bottom hem width | 1 | 53 | 55.5 | 58 | 60.5 | 63 | 65.5 |
Measured flat, in centimetres. The tolerance is the plus or minus the factory may vary by.
How to measure each point
Lay the garment flat, smooth it without stretching it, and measure straight across or straight down with a soft tape. The grade is how much each point grows from one size to the next. In this example the chest grows 2.5 cm a size and the body length 2 cm.
- Chest width (1 cm below armhole)
- Straight across from side edge to side edge, 1 cm below the bottom of the armhole.ExampleM 58 cm · ±1 cm · grade 2.5 cm a size
- Body length (HPS to hem)
- From the high point of the shoulder, where the shoulder seam meets the neckband, straight down to the hem edge.ExampleM 71 cm · ±1 cm · grade 2 cm a size
- Shoulder width
- Straight across the back from shoulder point to shoulder point. On a dropped shoulder, the shoulder point is the seam where the sleeve joins, wherever it falls.ExampleM 53 cm · ±1 cm · grade 2 cm a size
- Sleeve length
- From the shoulder point along the top fold of the sleeve to the sleeve hem edge.ExampleM 23 cm · ±0.5 cm · grade 1 cm a size
- Sleeve opening / cuff
- Straight across the sleeve hem, edge to edge.ExampleM 19.5 cm · ±0.5 cm · grade 0.5 cm a size
- Neck width
- Straight across the neck opening at the high points of the shoulder, seam to seam.ExampleM 19 cm · ±0.5 cm · grade 0.5 cm a size
- Bottom hem width
- Straight across the bottom edge, side to side.ExampleM 58 cm · ±1 cm · grade 2.5 cm a size
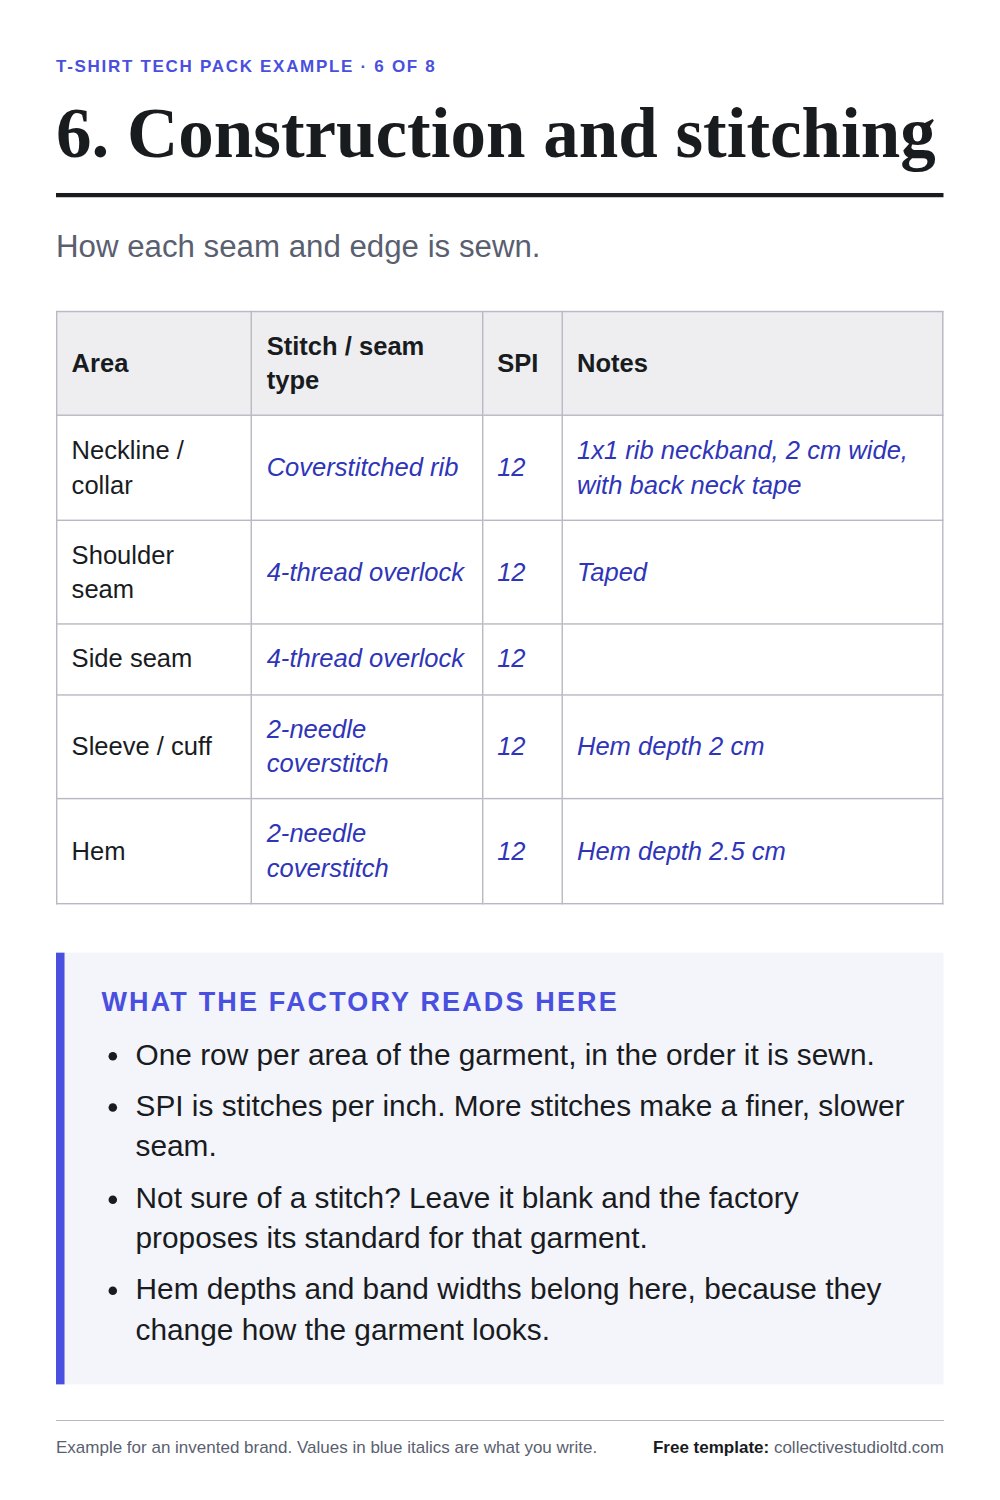
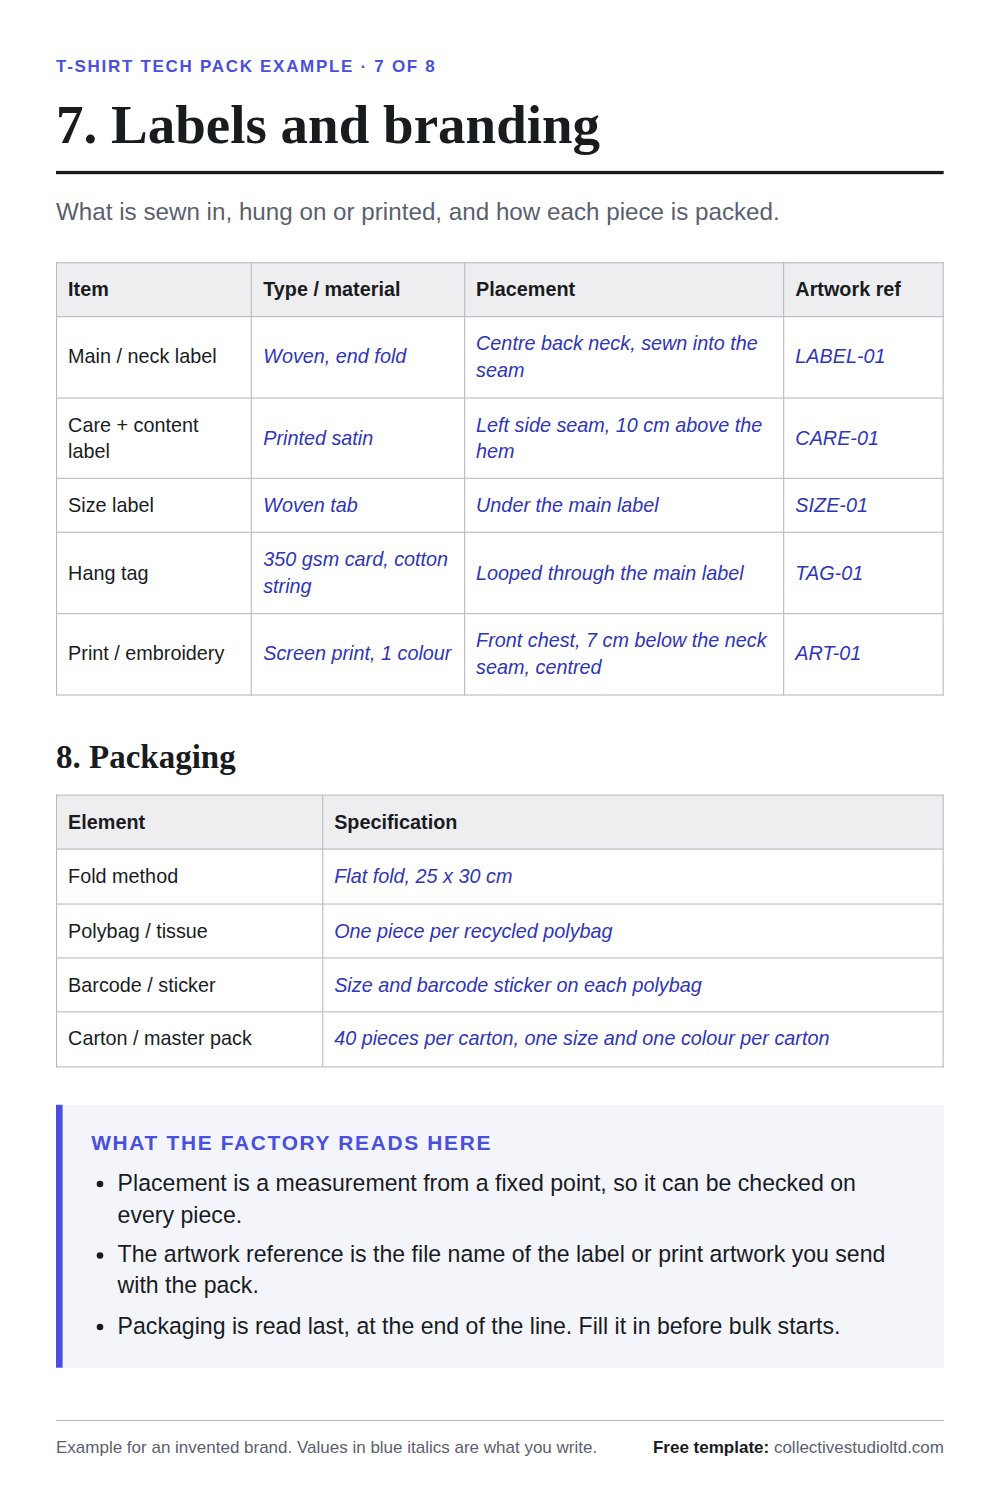
The rest of the example specifies a 1x1 rib neckband with back neck tape, coverstitched hems, a woven neck label, and a one-colour screen print placed 7 cm below the neck seam, centred. Download the Excel version to see every section filled in, or print the PDF and complete it by hand. Making tees? Our T-shirt manufacturing page covers fabric weights and minimums.
What goes in each section, field by field
The template has nine sections, in roughly the order a factory reads them: what the garment is, what it is made from, what size it is, how it is sewn and how it is finished. Below is every field, what to write in it, and a worked example from the invented heavyweight T-shirt in the Excel version. The examples show the level of detail a factory needs; they are not measurements or materials to copy.
1. Style summary
The basics that identify the garment. Every email, sample tag and invoice about it will point back here.
- Brand
- Your brand name as it appears on the labels.ExampleNorthfold
- Style name
- The name your team uses for the garment.ExampleHeavyweight tee
- Style number
- A short code that belongs to this garment and never changes. Put it in every file name and email subject.ExampleNF-T01
- Season / drop
- When it goes on sale.ExampleSS27
- Designer
- The person who answers the factory's questions about it.ExampleA. Rivera
- Date and version
- Raise the version number and change the date every time anything changes, even one measurement.Example1 October 2026 · version 1
- Sample size
- The size the first sample is cut in. Every other size is graded from it.ExampleM
- Garment type and fit
- What it is and how it should sit on the body.ExampleT-shirt · oversized
- One-line description
- The garment in one sentence, naming the features that make it this style and not another.ExampleBoxy heavyweight tee with a dropped shoulder and a 2 cm rib neckband.
2. Technical sketch
Two boxes, front view and back view. A flat drawing, not a fashion illustration: the garment laid flat, every seam visible.
- Front view
- Draw or paste the front flat. Mark the print area and label anything a seam alone does not explain. A clear phone photo of a hand drawing is fine.ExampleFront flat with a dashed box for the chest print
- Back view
- The back flat, even when it looks plain. Back neck tape, a back print or a split hem only show up here.ExampleBack flat showing the back neck tape
3. Bill of materials
One row for each fabric and trim, with six columns: material, placement, composition, weight, colour and supplier.
- Composition
- Fibre content in percent, plus the construction. This is what the factory buys fabric against.ExampleMain fabric: 100% combed cotton, single jersey
- Weight / GSM
- The finished fabric weight in grams per square metre. Our fabric and GSM guide gives the usual range for each garment.ExampleMain 240 GSM · rib 260 GSM
- Placement
- Where on the garment each material goes.ExampleBody and sleeves · neckband
- Colour
- The colourway name, or "dyed to match" for rib, thread and tape that follow the body colour.ExampleAs colourway · dyed to match
- Supplier
- Name a mill or trim source only if you have one. Otherwise write "to be advised" and the factory proposes one.ExampleTo be advised
- Rows you do not need
- Write "not used" rather than leaving them blank, so the factory knows the row was considered. Add a row for anything else, such as neck tape.ExampleDrawcord: not used · Neck tape: cotton herringbone, 1 cm
4. Colourways
One row per colour version of the garment, with a reference for the body, the rib or trim and the print.
- Colourway name
- The name you will sell it under.ExampleNavy · Off-white
- Pantone / TCX
- A Pantone TCX reference for the body colour, or post a physical swatch. A colour word on its own gets interpreted.Example19-4024 TCX · 11-0105 TCX
- Body, rib / trim, print
- The colour of each part in this colourway, including the print ink.ExampleNavy body, navy 1x1 rib, white one-colour print
5. Points of measure
The size chart: seven points in centimetres, a tolerance column and sizes XS to 2XL. The full example and how to measure each point are in the T-shirt example above.
- Sample-size column
- Fill this first, from a garment you like measured flat. The other columns can wait.ExampleM: chest 58, body length 71, sleeve 23
- Tolerance
- How far the factory may vary, plus or minus, at each point.Example±1 cm on chest and length · ±0.5 cm on sleeve and neck
6. Construction and stitching
How each part is sewn. Five rows: neckline, shoulder seam, side seam, sleeve and hem.
- Stitch / seam type
- The machine stitch for each seam. If you do not know, leave it blank and the factory proposes the standard one for the fabric.ExampleShoulder and side seams: 4-thread overlock
- SPI
- Stitches per inch: how many stitches the machine makes in one inch of seam. A higher number means shorter stitches.Example12
- Notes
- Anything the stitch name does not say: widths, depths, tapes.Example1x1 rib neckband 2 cm wide with back neck tape · hem depth 2.5 cm
7. Labels and branding
Each label, tag and print, with its type, its position and the artwork file that goes with it.
- Type / material
- Woven, printed or heat transfer, and the material.ExampleNeck label: woven, end fold · care label: printed satin
- Placement
- A measurement from a fixed point, so nobody has to guess.ExampleCare label: left side seam, 10 cm above the hem
- Artwork ref
- The file name of the artwork you send with the pack, so every label matches one file.ExampleLABEL-01 · CARE-01 · ART-01
- Print / embroidery
- Method, number of colours and position.ExampleScreen print, 1 colour, front chest, 7 cm below the neck seam, centred
8. Packaging
How each piece is folded, bagged, labelled and packed. If you sell through a retailer or a fulfilment warehouse, ask for their packing rules and copy them here.
- Fold method
- The fold and the folded size.ExampleFlat fold, 25 x 30 cm
- Polybag / tissue
- What each piece is packed in.ExampleOne piece per recycled polybag
- Barcode / sticker
- What goes on the outside of each bag.ExampleSize and barcode sticker on each polybag
- Carton / master pack
- Pieces per carton and how sizes and colours are split between cartons.Example40 pieces per carton, one size and one colour per carton
9. Order and approvals
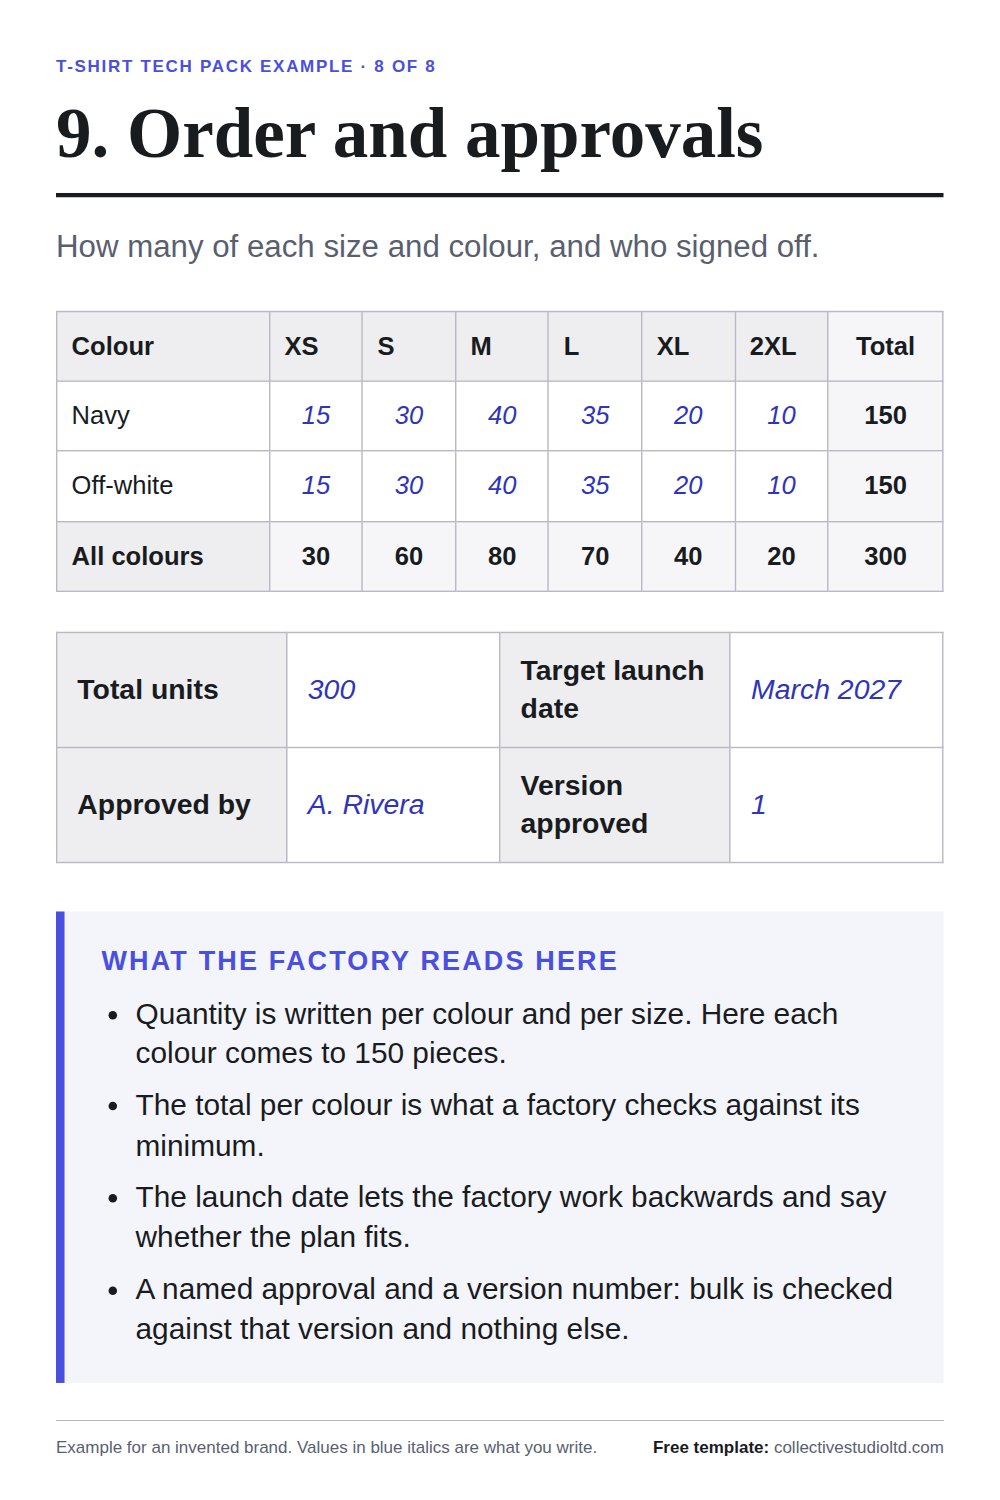
Quantities, the date you are working towards and who signed the pack off.
- Qty per size / colour
- The split by size for each colour. Each colour is its own run: our minimum is 150 pieces per style and per colour, so two colours start at 300. The MOQ calculator suggests a split.ExampleEach colour: XS 15, S 30, M 40, L 35, XL 20, 2XL 10
- Total units
- The sum of the split, across all colours.Example300
- Target launch date
- The date it goes on sale. Work back from it: about 10 days of sampling, then 40 to 50 days of production after you approve the sample, then freight. The launch date calculator does the sums.ExampleMarch 2027
- Approved by
- The person who signed off this version. It is the record of what was agreed.ExampleA. Rivera
Six things that go wrong, from the factory’s side
These are gaps that leave a factory guessing when a tech pack arrives. None of them will stop us quoting, and none of them is hard to fix, but each one costs you a sampling round if it is left blank.
A sketch with no measurements
A flat sketch shows the shape. It says nothing about the size. Without points of measure, a pattern maker has to draft the sizes from a starting pattern of their own, and the first sample fits that pattern rather than what you had in mind. Even three numbers, chest, body length and sleeve length, change the outcome more than a beautiful drawing does.
Measurements with no tolerances
A 52 cm chest is not one number, it is a range. Fabric relaxes and seams take up, so a factory works to a tolerance. If you do not state yours, the factory has to choose them for you, and if its choice is tighter or looser than you expected, you find out at sample stage rather than now. Our example uses plus or minus 1 cm on chest and body length and 0.5 cm on smaller points: a starting point to adjust, not a rule.
A colour named, not referenced
"Navy" is not a colour, it is a family. Give a Pantone TCX reference and you get that colour; give a word and you get our interpretation of it, then a round of lab dips to correct it. If you have no Pantone book, send a physical swatch. A piece of fabric in the post beats any hex code on a screen, because your monitor and our dye house do not agree.
Fabric described by feel
"Heavyweight", "soft", "premium" and "good quality" all mean different things to different people. What we can actually buy against is composition and weight: 100% combed cotton, 240 GSM, single jersey. If you do not know the GSM, name a garment you want matched and post it to us and we will weigh it and work from the real thing.
Print and label placement left to us
Where a print sits is a design decision, and a factory guessing at it will centre it and hope. Give a measurement from a fixed point, such as 7 cm below the neck seam, centred, and it lands where you meant. The same goes for neck labels, care labels and hang tags: state the position, and whether a printed neck label replaces a sewn one.
No sample size stated
A size range is graded from one base size, and which size that is changes every other size in the run. If the tech pack does not say, the factory has to pick one, and a guess can be wrong. One field, thirty seconds, and the whole grade is anchored where you want it.
How to use it
- Download the PDF to print and fill in by hand, or the Excel file to type straight into the cells.
- Fill in everything you have decided. A sketch and rough measurements go a long way.
- Gaps are fine: ask the factory to work through them with you during sampling.
- Save a new copy for every change, with the style number and version in the file name, and send it as a PDF.
- Attach it to your enquiry so your quote and first sample are as accurate as possible.
Sample approved? The next document is the order itself. Our free purchase order template for clothing carries the tech pack version and the approved sample onto the order.
New to tech packs?
Start with what a tech pack is, then follow our step-by-step guide to making one. If you just want a quick tick-list rather than a form to fill in, take the tech pack checklist instead. And if you have not chosen a factory yet, our guide to finding a clothing manufacturer covers what to check first.
What clients say
Best supplier! On time, reliable and perfect craft.
Wonderful people to work with — very professional and knowledgeable, also accommodating to the needs of their customers.
Frequently asked questions
What is a tech pack template?
A tech pack template is a ready-made form that sets out every section a manufacturer needs, so you fill in your garment's details instead of building the document from scratch. Ours runs to three A4 pages in nine sections: style summary, technical sketch, bill of materials, colourways, points of measure, construction and stitching, labels and branding, packaging, and order and approvals. Most sections are tables with headed columns, such as composition, weight in GSM, colour and supplier for every fabric and trim, so empty cells stand out before you send it.
Which tech pack template should I download?
Start with the one that matches your garment. There are seven, all free: this general template and six garment versions, for the T-shirt, hoodie, jogger, crewneck sweatshirt, polo shirt and shorts. Each garment version keeps the same nine sections but names that garment's parts and points of measure, with its own filled-in example. The T-shirt template has 13 points of measure, including front and back neck drop and neckband width. The hoodie has 14, with hood, cuff, waistband and pocket. The jogger has 13, from the waist through rise and inseam to the cuff. The sweatshirt has 14, the polo shirt 16, with collar, placket and side vents, and the shorts 15. For anything else, such as a long-sleeve top or a dress, use the general template, whose seven points of measure you can rename or add to in Excel. All seven come as a PDF and an Excel file, sized XS to 2XL, with no sign-up.
Can I fill in the tech pack template online?
Yes. The form in the Fill it in online section of this page has the same nine sections as the PDF and Excel versions. Pick a garment (the general template, T-shirt, hoodie, sweatshirt, joggers, polo shirt or shorts), then start with empty boxes or with our worked example already typed in. You can add and remove rows, rename the sizes, add a front and a back sketch as pictures, and let the form work out every size from one sample-size measurement and a grade. The order grid adds up each colour and the whole order. When you finish, save the result as a PDF through your browser's print window, or download a CSV file that opens in Excel and Google Sheets. There is no sign-up. Your draft is stored in your own browser, so it is still there when you come back on the same device, and nothing you type is sent to us.
Is this tech pack template really free?
Yes. Click either download button and the file saves straight away, as a PDF or an Excel workbook: no email address, no sign-up and no account. Use it for as many styles as you like, save a fresh copy for each new garment, and send the completed version to any manufacturer, including ones that are not us. We publish it for a practical reason. A filled-in tech pack gives a factory less to guess, whoever makes the garment. This template comes from the factory side of the exchange, so it asks for what a factory actually buys fabric against and cuts a sample from: composition and weight in GSM, measurements with tolerances, colour references and a stated sample size. If you prefer a tick-list to a form, our free, printable tech pack checklist covers much the same ground.
Do you have a tech pack example I can look at?
Yes, on this page and in the download. The T-shirt tech pack example section above shows eight pictures of the template filled in for one garment, an invented brand's heavyweight T-shirt: the style summary, the technical sketch, the bill of materials, the colourways, the size chart, the construction table, labels and packaging, and the order quantities. Select any picture to open it full size. The same values are in the Excel version, in grey italics, ready to type over: a 240 GSM fabric, Pantone references, a size chart from XS to 2XL with a tolerance on every point, stitch types, label placements and an order split by size. We invented the garment on purpose. Real tech packs carry a brand's measurements and suppliers, which are not ours to publish. Treat the numbers as a guide to the level of detail a factory needs, not as measurements to copy.
Do I need to fill in the whole tech pack?
No. Fill in what you have decided, leave the rest blank, and send it: a partial tech pack still gets you a closer first sample than a paragraph of description. If you only have time for a few fields, choose these five. The sketch, front and back. Three measurements: chest, body length and sleeve length. Fabric composition and weight in GSM, or a garment you want matched. Colour as a Pantone TCX reference or a physical swatch. And the sample size, because the whole grade is built from it. Construction, packaging and label details can follow during sampling. Do not hold back the enquiry until every box is full.
Can I use this template with a different manufacturer?
Yes. The sections cover what a factory needs to quote and to cut a sample, and apart from our branding, a short note at the top and our contact details in the footer, none of the fields assumes you are ordering from us. Units are metric, with measurements in centimetres and fabric weight in GSM. If a supplier quotes ounces per square yard, our GSM converter gives the equivalent. The bill of materials has a supplier column, so you can name a mill or trim source your manufacturer already uses, and a placement column tying each fabric and trim to its place on the garment. If a factory prefers its own format, your completed template still gives you every answer to copy across. And if you are still choosing, our guide to finding a clothing manufacturer covers what to check before you send anyone your design.
Is there an Adobe Illustrator version of the template?
No. We publish two formats, a PDF and an Excel workbook, and Illustrator works alongside them rather than replacing them. Illustrator is a good tool for drawing flats, so draw your front and back flats there, or in any drawing app, export them as PNG or PDF, and paste them into the sketch boxes in the Excel version. With the PDF, print them and attach them to the page. The rest of a tech pack is tables: materials, measurements, stitching, labels and quantities. A spreadsheet suits those better, because a corrected number does not mean redrawing a layout. If you already build tech packs in Illustrator, copy our nine section headings and table columns into your own layout. What matters to a factory is that every section is there and in a sensible order, not which program made it. Whichever you use, send the finished pack as a PDF, which opens the same way on any computer.
How should I keep track of tech pack versions?
Use the version and date fields in section 1, and change both every time anything changes, even a single measurement or a label position. Put the style number and version in the file name, such as NF-T01_v2, so the newest file is obvious in an inbox. When you send a new version, list what changed in the email, because nobody at a factory should have to compare two documents line by line to find a 1 cm difference. Send each agreed version as a PDF and keep every one. Never edit a version that has already been sent; save a new one instead. When a sample arrives, check which version it was made from before you judge it, since a sample made to an older pack will not match the newer one. The approved-by line in section 9 then records who signed off the version that went into production, which is the one bulk is checked against.
Does a tech pack protect my design?
Not by itself. A tech pack is a production specification, not a legal document. What it does is remove doubt about what was agreed: the style number, version and date fields show which revision a sample was made from, and the approved-by line in section 9 shows who signed it off. Keep every dated version you send. For legal protection of a design, ask an IP lawyer in your market about registering it, and agree in writing with your manufacturer what happens to your designs. If the design is sensitive, ask the factory to sign an NDA before you share the full pack; we are happy to sign one.
My garment has more parts than the template lists. Can I add rows?
Yes, and you should, because a missing row is a missing instruction. In the Excel version, the first sheet, Tech Pack, is not locked: insert a row inside the right table for each extra fabric or trim, such as a lining or an elastic, and for each extra point of measure, such as hood height. The Quantities and Grading sheets are protected, without a password, so their totals cannot be typed over by accident. To go past their six colours, eight sizes or ten points of measure, choose Review, then Unprotect Sheet, insert the row or column inside the grid rather than after its last line, and copy the formulas from the line next to it. In the PDF, the bill of materials and the points-of-measure chart each end with one blank row; beyond that, attach a page with the same column headings. The hoodie and jogger versions already include rows such as hood lining, elastic and cuff height.
Sources
Read on 14 November 2026. Everything else on this page is our own template and our own practice as a factory.
- Pantone, 19-4024 TCX Dress Blues: the navy in the example.
- Pantone, 11-0105 TCX Antique White: the off-white in the example.
- Google Docs Editors Help, work with Office files: opening and converting the Excel file in Google Sheets.
Download the template (PDF)Download the Excel version (.xlsx)Send us your idea
Collective Studios under the direction of Mr Jamish and his daughter Homaira represent the future of RTW production in Bangladesh. A thorough approach to detail governed by a genuine standard of quality. Masters of and partners in the process!