T-Shirt Tech Pack Template
A tech pack built for one garment: the crew-neck T-shirt. Thirteen points of measure instead of the usual seven, the neckline and hem details a tee is judged on, and a complete filled-in example. Free as a PDF or an Excel file, with no email required.
Our general tech pack template works for any garment. This version is for T-shirts only: the size chart lists the 13 points a T-shirt is measured on, and the materials, construction, label and packaging tables already name the parts of a T-shirt, so you fill in values rather than work out what to ask for. The sections and their order are the same, so any factory reads it the usual way.
The PDF is the blank form, three A4 pages to print and fill in by hand, with a light outline of a T-shirt in the sketch boxes to draw over. The Excel file is the same form with every box already filled in for an invented brand, in grey italics to type over. We publish it as a factory that reads these documents every week; our T-shirt manufacturing page covers fabrics and minimums.
What a T-shirt tech pack is
A T-shirt tech pack is the instruction file a factory makes your tee from: a flat sketch, the fabric by composition, knit and GSM, a size chart with a tolerance for each point, the stitch for every seam, label and print positions, packing, and the order by size and colour. This template holds all of it for a crew-neck tee.
Each part of a tee has a place in the template. If you are not sure what a factory means by a word on the form, find the part here first.
| Part of the T-shirt | What it is | Where it goes in the template |
|---|---|---|
| Front and back body | The two main panels, cut from single jersey and joined at the side seams | Bill of materials (main fabric); size chart: chest width, body length, bottom hem width |
| Sleeve | Cut separately and set into the armhole | Size chart: armhole, bicep, sleeve length, sleeve opening; construction: sleeve attach |
| Neckband | A strip of 1x1 rib sewn round the neck opening, cut shorter than the opening so it lies flat | Bill of materials (neck rib); size chart: neck width, front and back neck drop, neckband width; construction: neckline |
| Back neck tape | A narrow herringbone tape covering the back neck seam from shoulder to shoulder | Bill of materials (neck tape); construction: back neck |
| Shoulder seam | Joins front to back; its outer end is the shoulder point, its inner end the high point of the shoulder (HPS) | Size chart: shoulder width, plus every length measured from the HPS; construction: shoulder seam, taped |
| Side seam | Joins the front and back panels down each side, so the body holds its shape | Construction: side seam; labels: the care and content label sits in the left side seam |
| Hems | The folded edges at the bottom of the body and the sleeves, coverstitched | Size chart: hem depth; construction: body hem and sleeve hem |
| Neck label | Your brand label at centre back neck | Labels and branding: main label, sewn under the neck tape, with the size label beneath it |
| Print area | Where the artwork sits, with its maximum size | Labels and branding: print row, positioned from the neck seam; bill of materials: print ink |
The parts of a crew-neck T-shirt and the template section each one is specified in. The example values for every row are in the Excel version.
What the template looks like
Three A4 pages, shown here in full. Nothing is hidden behind a form.
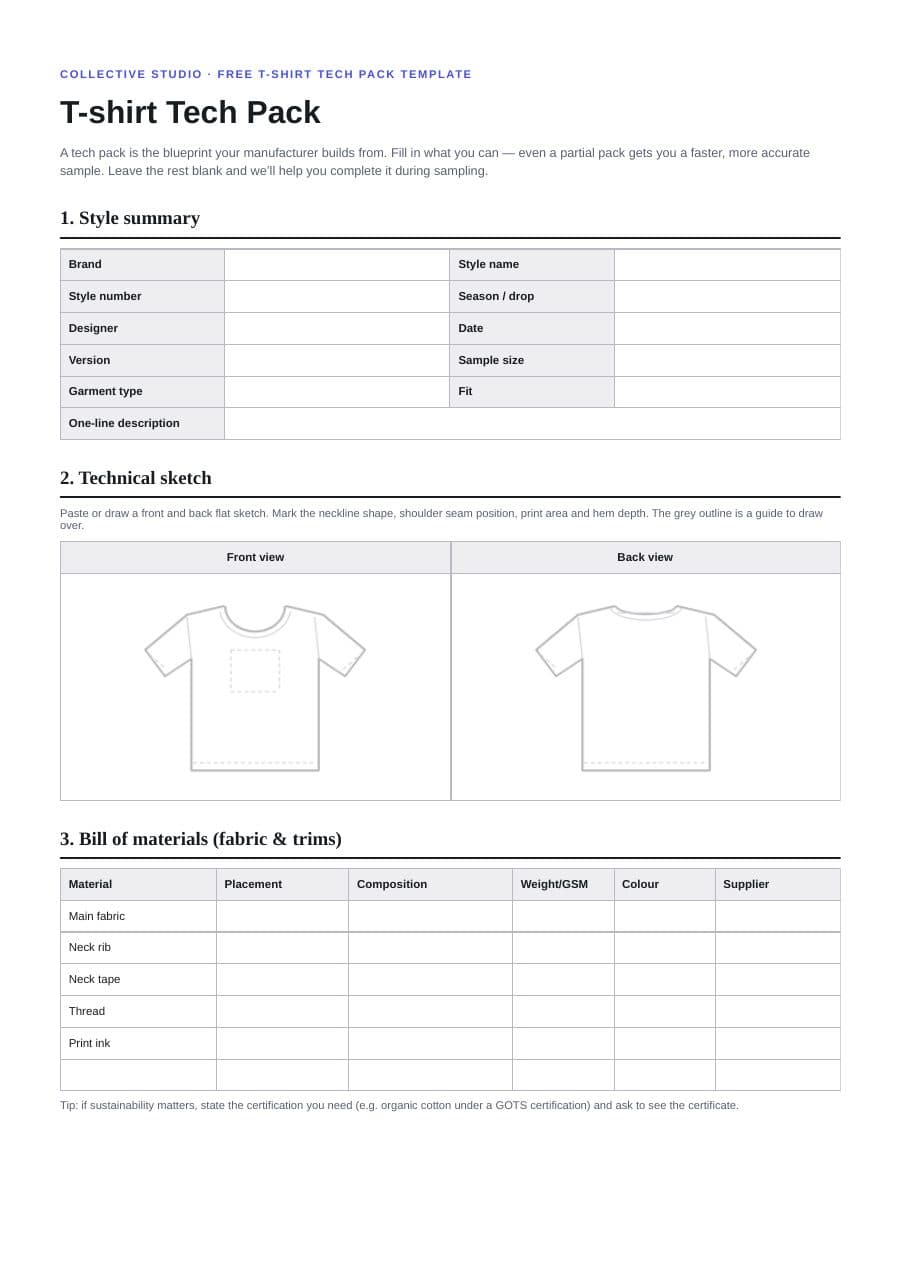
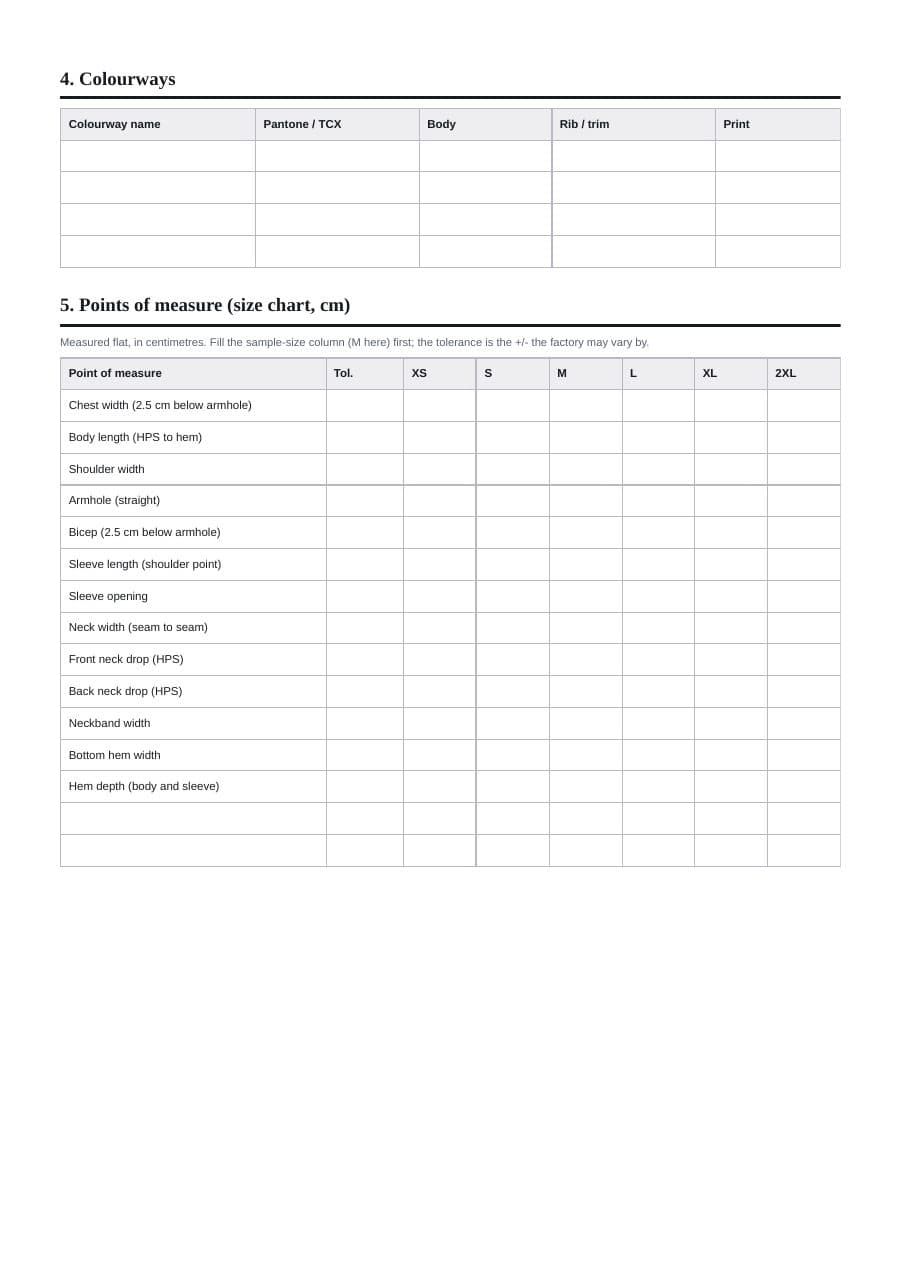
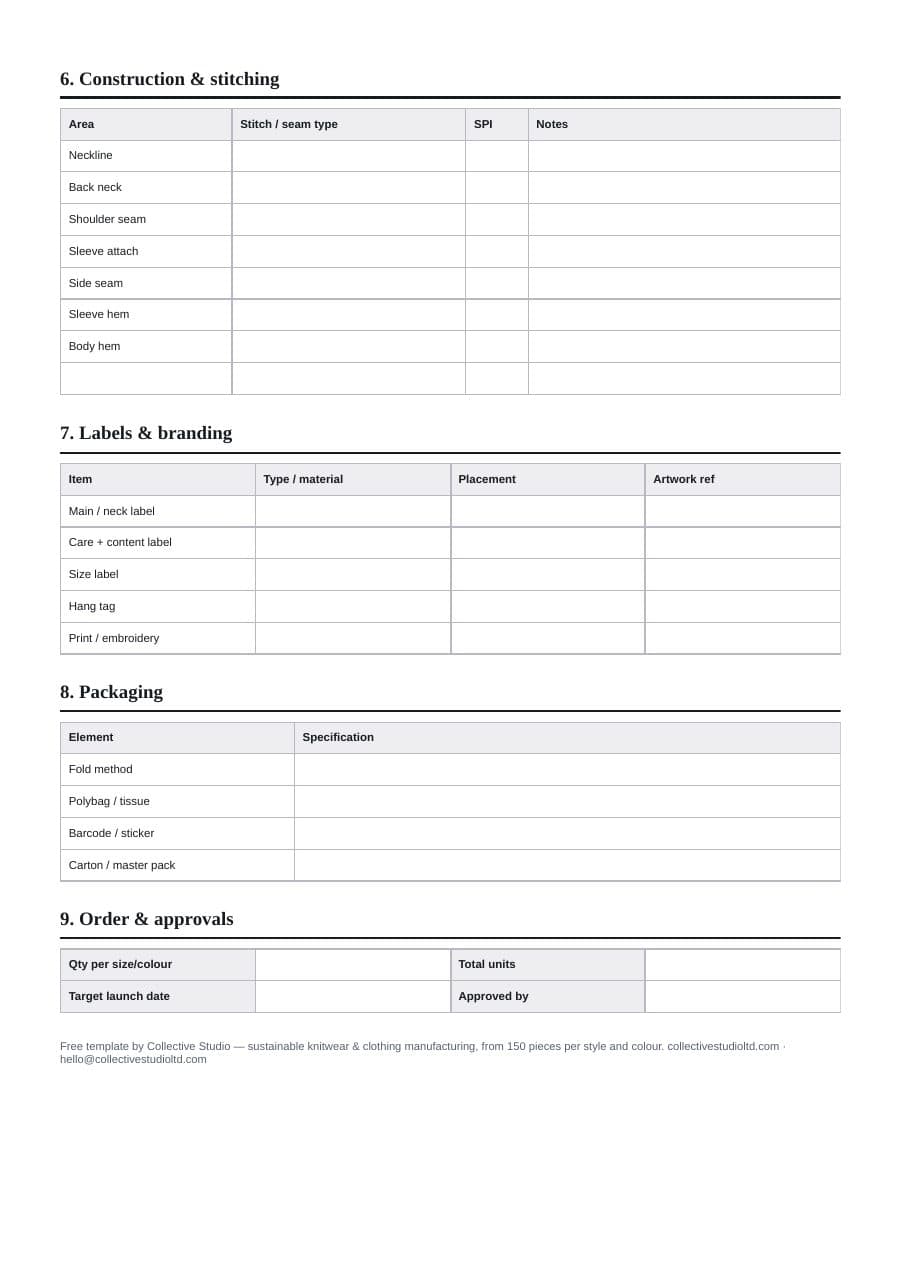
T-shirt size chart example
The example in the Excel version is a classic-fit crew-neck tee with a set-in sleeve, 2 cm 1x1 rib neckband and side seams. Here is the part a factory reads most closely, graded from XS to 2XL. The brand and the numbers are invented to show the level of detail; measure a T-shirt you like and use your own.
| Point of measure | Tol. (+/-) | XS | S | M | L | XL | 2XL |
|---|---|---|---|---|---|---|---|
| Chest width (2.5 cm below armhole) | 1 | 46 | 48.5 | 51 | 53.5 | 56 | 58.5 |
| Body length (HPS to hem) | 1 | 68 | 70 | 72 | 74 | 76 | 78 |
| Shoulder width | 1 | 41 | 43 | 45 | 47 | 49 | 51 |
| Armhole (straight) | 0.5 | 20 | 21 | 22 | 23 | 24 | 25 |
| Bicep (2.5 cm below armhole) | 0.5 | 17 | 18 | 19 | 20 | 21 | 22 |
| Sleeve length (shoulder point) | 0.5 | 19 | 20 | 21 | 22 | 23 | 24 |
| Sleeve opening | 0.5 | 16 | 16.5 | 17 | 17.5 | 18 | 18.5 |
| Neck width (seam to seam) | 0.5 | 17 | 17.5 | 18 | 18.5 | 19 | 19.5 |
| Front neck drop (HPS) | 0.5 | 8 | 8.5 | 9 | 9.5 | 10 | 10.5 |
| Back neck drop (HPS) | 0.3 | 2 | 2 | 2 | 2 | 2 | 2 |
| Neckband width | 0.2 | 2 | 2 | 2 | 2 | 2 | 2 |
| Bottom hem width | 1 | 46 | 48.5 | 51 | 53.5 | 56 | 58.5 |
| Hem depth (body and sleeve) | 0.2 | 2 | 2 | 2 | 2 | 2 | 2 |
Measured flat, in centimetres. Fill the sample-size column (M here) first; the tolerance is the +/- the factory may vary by.
How to measure each point
Lay the garment flat, smooth it without stretching it, and measure with a soft tape in centimetres. The grade is how much each point grows from one size to the next in this example.
- Chest width (2.5 cm below armhole)
- Straight across from side seam to side seam, 2.5 cm below the bottom of the armhole.ExampleM 51 cm · ±1 cm · grade 2.5 cm a size
- Body length (HPS to hem)
- From the high point of the shoulder, where the shoulder seam meets the neckband, straight down to the hem edge.ExampleM 72 cm · ±1 cm · grade 2 cm a size
- Shoulder width
- Straight across the back from one shoulder seam point (where the sleeve is set in) to the other.ExampleM 45 cm · ±1 cm · grade 2 cm a size
- Armhole (straight)
- In a straight line from the shoulder point down to the bottom of the armhole, along the sleeve seam.ExampleM 22 cm · ±0.5 cm · grade 1 cm a size
- Bicep (2.5 cm below armhole)
- Across the sleeve, at right angles to its top fold, 2.5 cm below the bottom of the armhole.ExampleM 19 cm · ±0.5 cm · grade 1 cm a size
- Sleeve length (shoulder point)
- From the shoulder point along the top fold of the sleeve to the sleeve hem edge.ExampleM 21 cm · ±0.5 cm · grade 1 cm a size
- Sleeve opening
- Straight across the sleeve hem, edge to edge.ExampleM 17 cm · ±0.5 cm · grade 0.5 cm a size
- Neck width (seam to seam)
- Straight across the neck opening, from the neckband seam at one high point of the shoulder to the other.ExampleM 18 cm · ±0.5 cm · grade 0.5 cm a size
- Front neck drop (HPS)
- From an imaginary line between the two high points of the shoulder, straight down to the neckband seam at centre front.ExampleM 9 cm · ±0.5 cm · grade 0.5 cm a size
- Back neck drop (HPS)
- From the same line between the high points of the shoulder, straight down to the neckband seam at centre back.ExampleM 2 cm · ±0.3 cm · same in every size
- Neckband width
- The finished height of the rib, from the neck edge to the seam that joins it to the body.ExampleM 2 cm · ±0.2 cm · same in every size
- Bottom hem width
- Straight across the bottom edge, side seam to side seam.ExampleM 51 cm · ±1 cm · grade 2.5 cm a size
- Hem depth (body and sleeve)
- From the folded hem edge to the line of stitching, on the body and on the sleeve.ExampleM 2 cm · ±0.2 cm · same in every size
Materials and construction example
The bill of materials and the construction table from the same example. A factory buys fabric against composition and weight, and sews to the stitch named for each seam, so these two tables decide most of the price and most of the finish.
| Material | Placement | Composition | Weight |
|---|---|---|---|
| Main fabric | Body and sleeves | 100% combed cotton, single jersey | 180 GSM |
| Neck rib | Neckband | 95% cotton, 5% elastane, 1x1 rib | 220 GSM |
| Neck tape | Back neck, shoulder to shoulder | Cotton herringbone tape, 1 cm | — |
| Thread | All seams | 100% polyester, core-spun | — |
| Print ink | Front chest | Water-based screen-print ink | — |
| Area | Stitch / seam | Notes |
|---|---|---|
| Neckline | Rib attached with 4-thread overlock, then coverstitched, 12 SPI | 1x1 rib, 2 cm finished; rib cut shorter than the neck opening so it lies flat |
| Back neck | Taped, single-needle topstitch, 12 SPI | Herringbone tape covers the seam shoulder to shoulder |
| Shoulder seam | 4-thread overlock, 12 SPI | Taped so it does not stretch |
| Sleeve attach | 4-thread overlock, set-in, 12 SPI | Sleeve eased into the armhole |
| Side seam | 4-thread overlock, 12 SPI | Side-seamed body, not tubular |
| Sleeve hem | 2-needle coverstitch, 12 SPI | Hem depth 2 cm |
| Body hem | 2-needle coverstitch, 12 SPI | Hem depth 2 cm |
SPI is stitches per inch. Labels: main / neck label (centre back neck, sewn under the neck tape); care + content label (left side seam, 8 cm above the hem); size label (under the main label); hang tag (looped through the main label); print / embroidery (front chest, 8 cm below the neck seam at centre front, centred).
What a T-shirt tech pack needs that a general one skips
The neckline, in four numbers
A tee is judged at the neck first. Give the neck width, the front and back neck drop, the neckband width and the rib it is made from. Leave them out and the sample comes back with our standard crew, which may sit higher or lower than you meant. If the neckband must not ripple after washing, say so: it is set by how much shorter the rib is cut than the opening.
Fabric weight and yarn, not just “cotton”
Write the composition, the knit and the weight: 100% combed cotton single jersey, 180 GSM. Weight changes drape, opacity and price; we make tees from 140 to 240 GSM, and 180 is the everyday middle. Combed or ring-spun yarn gives a smoother face than carded, and the difference shows in a print.
Side-seamed or tubular
A tubular body has no side seams and is cheaper to sew, but it can twist after washing, so the side seam ends up crossing the front. A side-seamed body is cut flat and holds its shape. State which you want, and if twist matters, ask the factory what limit it works to.
Set-in or dropped shoulder
The shoulder seam position decides the whole silhouette. On a set-in sleeve the seam sits on the shoulder bone; on a dropped shoulder it falls down the arm, which changes the shoulder width, armhole and sleeve length in the chart. Mark it on the sketch and the chart reads correctly.
Print area measured from the neck seam
State the print's maximum size and its position from a fixed point: 8 cm below the neck seam at centre front, centred. A position measured from the hem moves with every size, so most brands measure from the neck. If the print is graded by size, say so; most are not.
Measurements before or after washing
Cotton jersey shrinks a little on the first wash. Say whether your chart is the garment as it leaves the factory or after a wash, and if you have a washed garment whose fit you like, measure that one. Otherwise the sample can be right on the table and short after the first wash.
For the fabric side, read what jersey fabric is, rib knit for neckbands and combed, carded or ring-spun cotton. To work out how much fabric an order needs, try the fabric consumption calculator.
Using the template for other T-shirt styles
The template is drawn for a classic crew-neck tee with a set-in sleeve. Most other tees use the same nine sections. What changes is a handful of points of measure and a row or two in the materials and construction tables, so you adapt this file rather than start a new one. Add the rows in the Excel version, or on an extra page with the same column headings if you fill in the PDF, and mark the new shape on the sketch.
| Style | Sketch and size chart | Materials and construction |
|---|---|---|
| V-neck | Draw the V. The front neck drop becomes the depth of the V, much deeper than a crew's, so measure it carefully from the HPS line. | Add how the rib meets at the point of the V: mitred, or overlapped, and which side lies on top. |
| Oversized or boxy | The shoulder seam falls down the arm, so shoulder width grows, the armhole deepens and the sleeve, measured from the dropped shoulder point, gets shorter. Drafted as its own block, not a regular tee graded up. | Check the neckband width and the rib still suit the jersey, especially if you choose a heavier one. |
| Raglan | No shoulder seam: the sleeve runs to the neckline. Replace shoulder width and sleeve length from the shoulder point with sleeve length from centre back neck, and measure the raglan armhole along its seam. | Replace the shoulder seam and sleeve attach rows with front and back raglan seams. For contrast sleeves, add a sleeve column to the colourways. |
| Ringer | Same chart as a crew. Add sleeve band width if the sleeves end in a band rather than a hem. | Add a sleeve band row to the bill of materials, and put the contrast colour in the rib or trim column of each colourway. |
| Longline | Body length grows. For a curved hem or side splits, add the hem curve (centre back length against side length) and the split length. | State how the curved hem and the splits are finished, and whether the top of each split is bar-tacked. |
| Pocket tee | Add pocket width and height, and the pocket position measured from the HPS and from centre front. | Add the pocket fabric, usually the main jersey, and a construction row for the pocket attach and its corner tacks. |
What to add or change in the crew-neck template for six other T-shirt styles. Everything not listed stays as it is.
Templates for other garments
- Hoodie tech pack template
- Jogger tech pack template
- Sweatshirt tech pack template
- Polo Shirt tech pack template
- Shorts tech pack template
- General tech pack template, for any other garment
- Tech pack checklist, if you prefer a tick-list
What clients say
Best supplier! On time, reliable and perfect craft.
Collective Studio is up and coming. Very hard working people who want to please their customers and grow partnerships together. Homaira is very knowledgeable in the knit industry and always willing to learn more. We are looking to grow our business with them.
Frequently asked questions
What should a T-shirt tech pack include?
Nine sections, the same as any garment, with the details a tee is judged on filled in. A style summary with the fit and the sample size. A front and back flat sketch that shows the neckline shape and the shoulder seam position. A bill of materials naming the main fabric by composition, knit and weight, such as 100% combed cotton single jersey at 180 GSM, plus the neck rib, tape and thread. Colourways with Pantone TCX references. A size chart: our template has thirteen points, including front and back neck drop, neckband width and hem depth, because those decide how a tee looks. Then construction, with the stitch for each seam, labels and print placement measured from the neck seam, packaging, and the order split by size and colour. Fill in what you know and send it; a factory helps you complete the rest during sampling.
How do I measure a T-shirt for a tech pack?
Take a T-shirt whose fit you like, ideally one that has been washed, and lay it flat on a table without stretching it. Use a soft tape and centimetres. Measure the chest straight across 2.5 cm below the armhole, and the body length from the high point of the shoulder, where the shoulder seam meets the neckband, down to the hem. Then the shoulder width from seam point to seam point, the sleeve length along the top fold, the sleeve opening, the neck width, and the front and back neck drop from a line between the two high points of the shoulder. Write these in the sample-size column of the chart and measure each point twice. You do not need to grade the other sizes yourself: in our example the chest grows 2.5 cm a size and the length 2 cm, and a factory can propose the grade from your one size.
What GSM should a T-shirt tech pack specify?
The weight you actually want, as a number, because words such as lightweight or heavyweight mean different things to every supplier. We cut and sew tees from 140 to 240 GSM. Around 140 to 160 GSM gives a light, drapey tee for summer or for layering. About 180 GSM is the everyday middle, opaque in pale colours and comfortable to wear, which is why our example uses it. From 200 to 240 GSM the tee feels structured and premium and holds a large print well. Write the weight beside the composition and the knit, for example 100% combed cotton single jersey at 180 GSM, and give a tolerance if it matters to you. If you are not sure, post us a tee you like and we will weigh it and work from that. Our GSM converter gives the equivalent if a supplier quotes ounces.
How is this different from your general tech pack template?
The general template is built to work for any garment, so its size chart has seven points and its sections stay broad. This one is only for crew-neck T-shirts. Its chart has thirteen points, adding armhole, bicep, front and back neck drop, neckband width and hem depth, which are the measurements a tee is judged on. The construction table lists every seam on a tee, from the rib attach and back neck tape to the side seams and coverstitched hems, and the example is a classic-fit 180 GSM tee rather than an oversized heavyweight one. Use this version if you are making tees. Use the general template for anything else, or our hoodie and jogger versions for those garments. All of them share the same nine-section structure, so a factory reads them in the same way, and all are free to download in PDF and Excel.
How do I check a T-shirt sample against this tech pack?
Measure it twice: once as it arrives, and again after washing and drying it the way your customer will. Write the actual figure beside each target in the size chart and mark anything outside its tolerance, such as more than 1 cm off on chest width or more than 0.2 cm on neckband width. Judge the numbers against whichever state your chart describes, the garment as it leaves the factory or after a wash. Then check what a tape cannot show: the neckband lies flat without rippling, the side seam runs straight down the side rather than twisting towards the front, the hems are coverstitched evenly, and the print sits at the distance from the neck seam that you wrote. Test labs follow ISO 6330 for the wash itself and ISO 16322-3 for twist after laundering. Send us your marked-up chart and photos, and we correct the pattern or the specification before bulk cutting.
I only want to print on blank tees. Which parts of this template do I need?
Fewer of them. When you buy a finished blank, its maker has already decided the fabric, the fit, the neckband and every seam, so the bill of materials, the size chart and the construction table would describe someone else's garment. Name the blank by brand, style and colour instead, and give the decorator the parts that are yours: the style summary, the artwork with its size and its position measured from the neck seam, ink colours with Pantone references, any relabelling, and how each piece is folded and packed. The labels and branding section and the packaging section of the template hold most of this. Our factory works the other way round: we cut and sew tees from fabric to your own pattern rather than printing bought-in blanks, so for us every section matters, the size chart most of all. If you want your own fit, weight or neckline, that is when the full template earns its place.
Where can I download a free T-shirt tech pack template as a PDF?
You can download Collective Studio's T-shirt tech pack template free from this page as a PDF or an Excel file, with no email address or sign-up required. The PDF is the blank form: three A4 pages to print and fill in by hand, with a light outline of a crew-neck tee in the sketch boxes to draw over. The Excel file is the same form with every box already filled in for an invented brand, in grey italics you type over. Both follow the nine standard sections a factory reads in order: style summary, sketch, bill of materials, colourways, size chart, construction, labels, packaging and the order. The size chart has thirteen points of measure from XS to 2XL. The Excel version also opens in Google Sheets or LibreOffice if you do not use Excel. Save a separate copy for each style, and send it as a PDF when it is ready.
Is there a T-shirt tech pack example I can look at?
Yes: the Excel version of this template is a complete, filled-in example for a classic-fit crew-neck tee, and its main tables are shown on this page. The invented brand, Northfold, makes a side-seamed tee with a set-in sleeve in 100% combed cotton single jersey at 180 GSM, with a 2 cm neckband in 1x1 rib of 95% cotton and 5% elastane. Its size chart gives thirteen points from XS to 2XL, such as a 51 cm chest and a 72 cm body length in size M, each with its own tolerance. The construction table names every seam at 12 stitches per inch, the labels table places a one-colour screen print 8 cm below the neck seam, and the order splits 300 pieces across two colourways, black and heather grey. The numbers show the level of detail a factory needs. Measure a tee you like and replace them with your own.
How do I adapt a T-shirt tech pack for an oversized, V-neck or raglan tee?
Keep the same template and change a handful of rows, because most tee styles share the same nine sections. For an oversized or boxy tee, the shoulder seam falls down the arm, so the shoulder width grows, the armhole deepens and the sleeve, measured from that dropped shoulder point, gets shorter; it should be drafted as its own block rather than a regular tee graded up. For a V-neck, draw the V and treat the front neck drop as the depth of the V, then say whether the rib is mitred or overlapped at the point and which side lies on top. For a raglan there is no shoulder seam, so replace shoulder width and sleeve length with sleeve length from centre back neck, and swap the shoulder seam and sleeve attach rows for front and back raglan seams. Add the rows in the Excel version, or on an extra page, and mark the shape on the sketch.
What stitches and seams should a T-shirt tech pack specify?
Name the stitch for every seam, plus the stitches per inch, because the stitch decides how the tee stretches and how it wears. In our crew-neck example, the neck rib is attached with a 4-thread overlock and then coverstitched, and the back neck seam is covered with herringbone tape from shoulder to shoulder. The shoulder seams are overlocked and taped so they do not stretch. The sleeves are set in with a 4-thread overlock, the side seams are overlocked, and the body and sleeve hems are finished with a 2-needle coverstitch, 2 cm deep. Every seam runs at 12 stitches per inch. Say whether the body is side-seamed or tubular. A tubular body has no side seams and is cheaper to sew, but it can twist after washing, so the side seam ends up crossing the front, while a side-seamed body is cut flat and holds its shape. If twist matters, ask the factory what limit it works to.
Sources
- ISO 6330:2021, Textiles: domestic washing and drying procedures for textile testing
- ISO 16322-3:2021, Textiles: determination of spirality after laundering, woven and knitted garments
Download the T-shirt template (PDF)Download the Excel version (.xlsx)Send us your tech pack