How to Measure a T-Shirt and a Hoodie, the Way a Factory Does
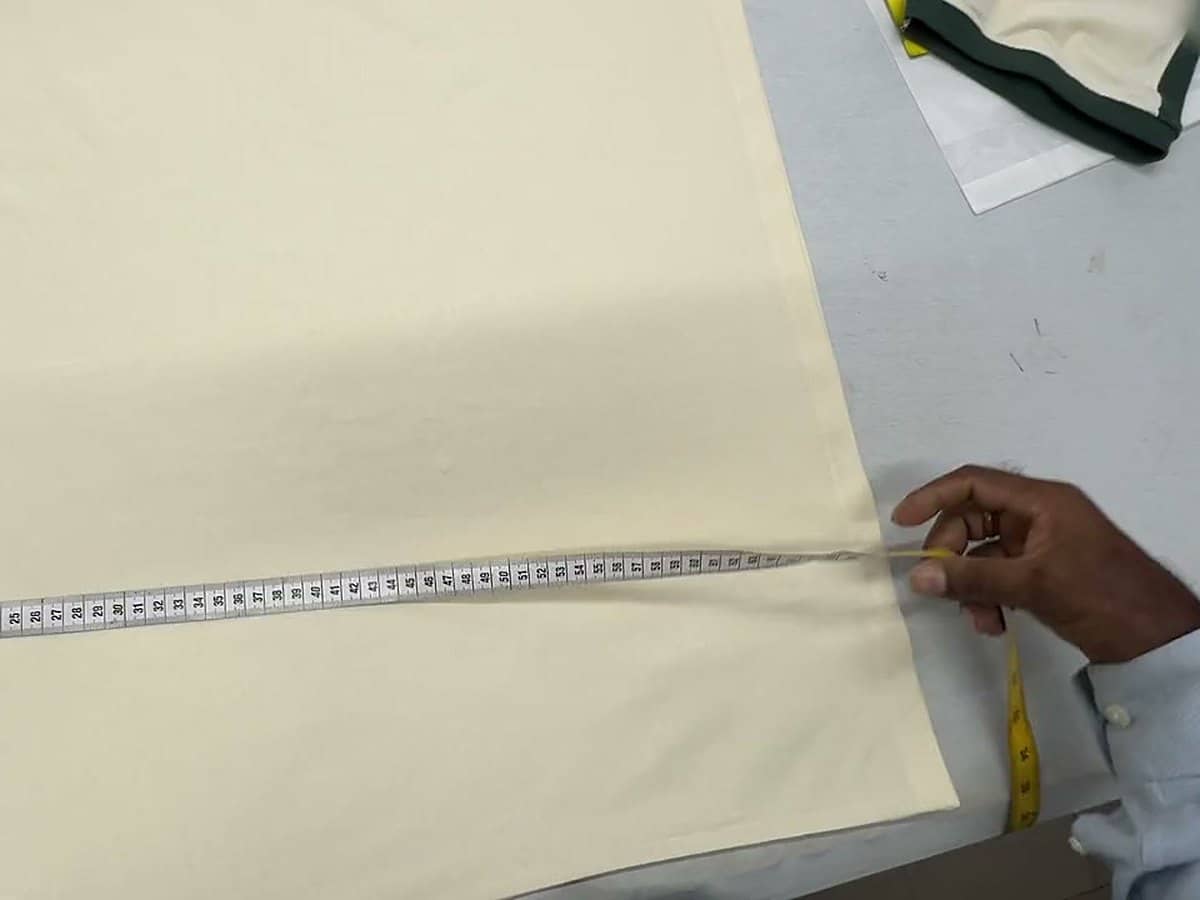
To measure a T-shirt, lay it flat on a table, smooth it out without pulling it, and use a soft tape measure. Take the chest straight across from side edge to side edge just below the armholes, the body length from the high point of the shoulder, where the shoulder seam meets the neckband, straight down to the hem, and the sleeve from the shoulder seam along the top fold to the sleeve edge. A chest taken flat is a half measurement: 58 cm flat is 116 cm all the way round. A hoodie is measured the same way, with extra points for the rib, the hood and the pocket.
We are Collective Studio, a family-run knitwear factory in Narayanganj, Bangladesh. We cut and sew T-shirts and hoodies, and our samples and bulk orders are measured against their size charts on our sewing floor with the points and the method set out below. The drawings are our own. Use them in coursework or in a brief to any factory, with credit.
The short version
- Lay the garment flat on a hard table, smooth it by hand without pulling it, and measure with a soft tape in centimetres.
- Widths go straight across, edge to edge. Chest, hem, sleeve opening, cuff and waistband widths are half measurements: double them to get the distance all the way round.
- Body length starts at the high point of the shoulder (HPS), where the shoulder seam meets the neckband or the hood. Sleeve length starts at the shoulder point, where the sleeve is sewn on.
- Pit to pit is the name resellers use for chest width. A factory chart also says how far below the armhole it is taken: 1 cm in our general tech pack template, 2.5 cm in our T-shirt and hoodie templates.
- A tolerance, such as plus or minus 1 cm, is the room a finished piece has either side of the chart figure.
- Rib cuffs and waistbands are measured relaxed, never stretched.
Measuring a shirt to buy or sell online
Three numbers cover most listings: pit to pit, length and sleeve. Each takes a few seconds with a soft tape:
- Lay it out. Put the shirt face up on a table, sleeves out to the sides, and smooth it flat with your hands without pulling.
- Pit to pit. Run the tape straight across the front, from one side edge to the other, just below the armpits. Keep the tape level.
- Length. Start at the top of the shoulder where it meets the collar, and go straight down to the bottom edge. Do not follow the side seam.
- Sleeve. Start at the shoulder seam and go along the top of the sleeve to its edge.
Write each number down with its unit and the word flat, for example: pit to pit 52 cm flat. A buyer can then lay a shirt they already own on a table, measure it the same way and compare. A photograph with the tape in shot answers most questions before anyone asks them.
How a factory lays out a garment to measure it
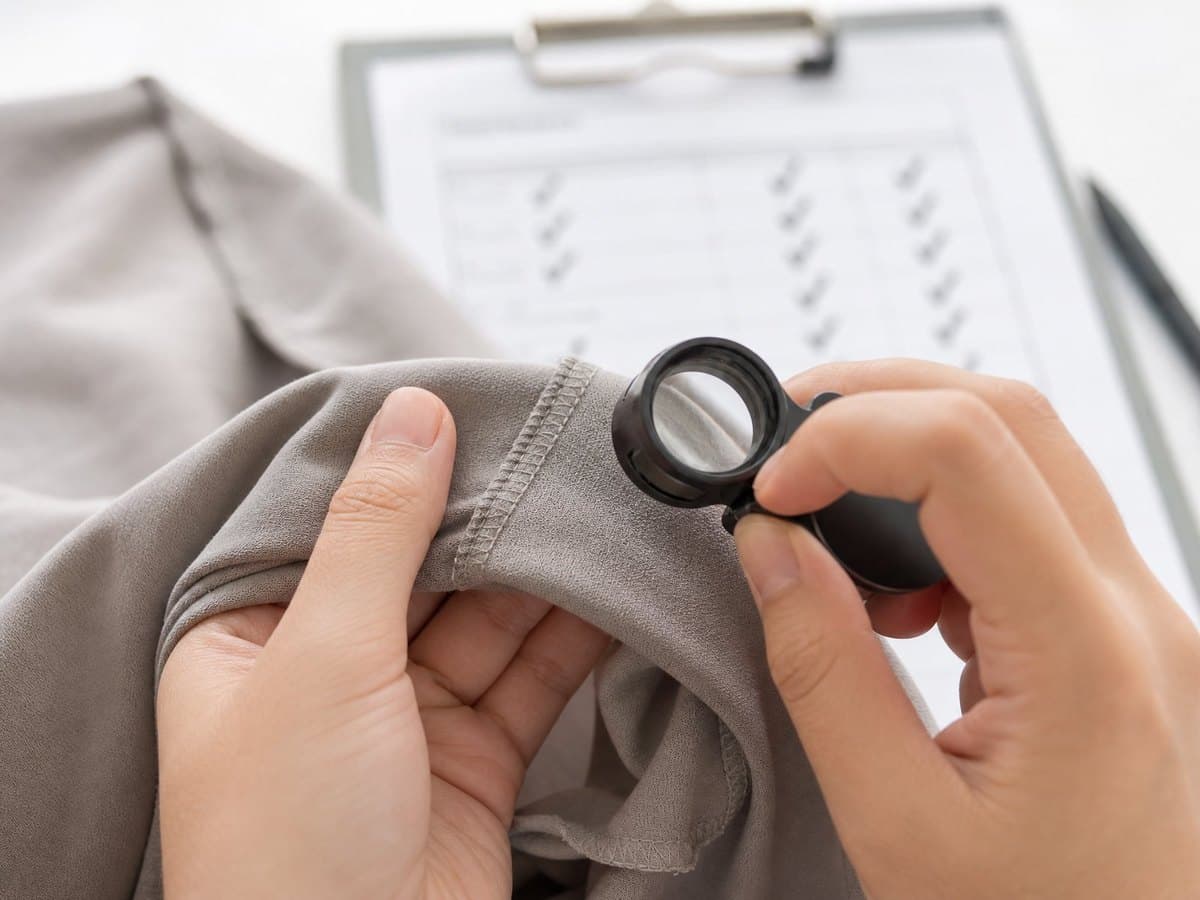
A factory measures a finished garment laid flat on a smooth table, smoothed by hand but not pulled, with a soft tape kept straight. The current international method is ISO 18890:2018, which defines the main measurement points on a garment and the method used to measure them, including how the garment is prepared first. The habit of measuring flat is much older. A 1943 US Commercial Standard for knit underwear, a historical document that is no rule today and is quoted here only because its wording can be read free, said the garment is “laid out without tension on a smooth flat surface so that creases and wrinkles will not affect the measurements”. It took the width of a knitted undershirt 1 inch below the armholes, which is 2.54 cm, and its length from where the shoulder joins the neck opening.
- Use a hard, flat surface. A bed or a sofa lets the fabric sink and the tape bend.
- Smooth from the centre outwards. Jersey stretches easily, so a garment pulled flat measures longer or wider than it really is.
- Keep the tape straight across or down, unless the point says to follow a line, as sleeve length follows the top fold of the sleeve.
- Measure each point twice. If the readings differ, smooth the garment again and take a third.
- Say whether it was washed. Cotton knits can shrink in the first wash, so copy the fit from a washed garment if you can, and write on the chart which it is.
The points of measure on a T-shirt
A point of measure is a fixed place where the tape starts and a fixed place where it ends, written down so that the brand, the factory and the inspector all measure the same thing. These eight decide how a T-shirt fits and looks. The names and definitions come from our tech pack templates. Our T-shirt tech pack template lists five more: back neck drop, armhole, bicep, neckband width and hem depth. The one point the templates take differently is the chest: our general tech pack template measures it 1 cm below the armhole, our T-shirt and hoodie templates 2.5 cm below. Neither is more correct. What matters is that the chart names the height and every piece is measured at that height.
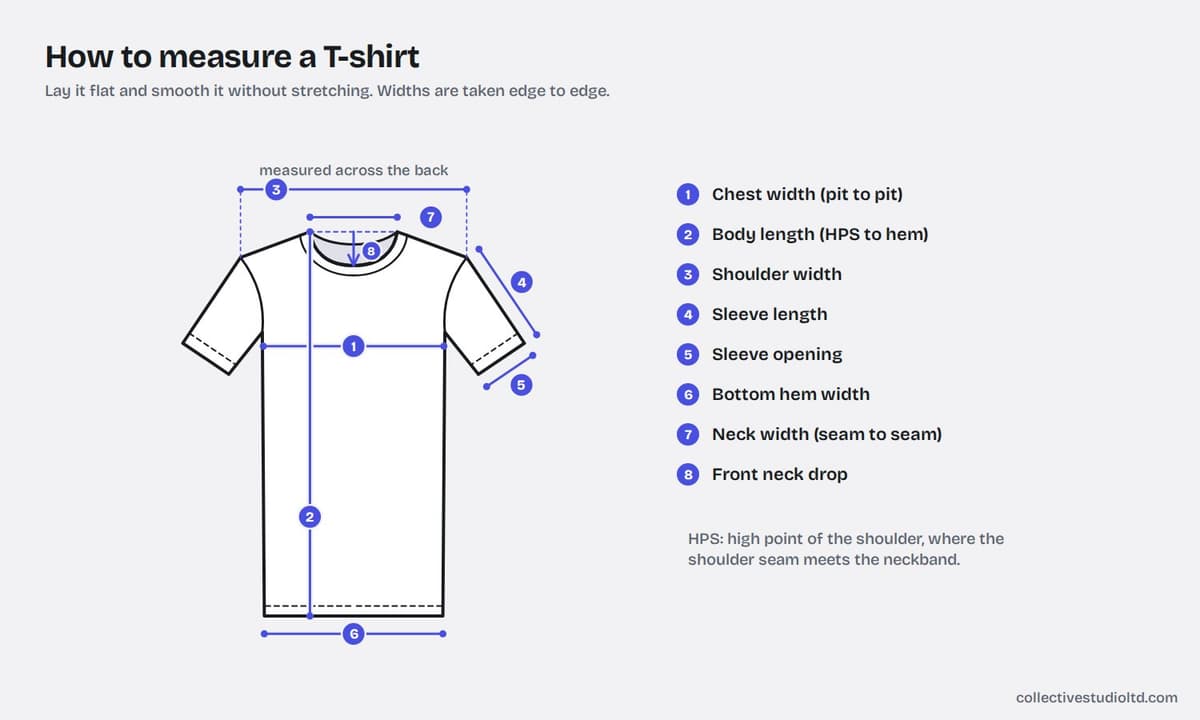
| Point | Where the tape starts and ends | The usual mistake |
|---|---|---|
| 1. Chest width (pit to pit) | Straight across from side edge to side edge, at the distance below the bottom of the armhole that the chart names: 1 cm in our general template, 2.5 cm in our T-shirt template. | Measuring right in the armpit on one shirt and lower on the next, or letting the tape slope. Name the distance and keep to it. |
| 2. Body length (HPS to hem) | From the high point of the shoulder, where the shoulder seam meets the neckband, straight down to the hem edge. | Starting at the centre back neck or the top of the collar, or running the tape down the side seam. Each gives a different number. |
| 3. Shoulder width | Straight across the back from shoulder point to shoulder point. On a dropped shoulder, the shoulder point is the seam where the sleeve joins, wherever it falls. | Measuring to where the shoulder bone would be on a dropped shoulder, instead of seam to seam. |
| 4. Sleeve length (shoulder point) | From the shoulder point along the top fold of the sleeve to the sleeve hem edge. | Measuring along the underarm seam, which is much shorter, or starting from the neck. |
| 5. Sleeve opening | Straight across the sleeve hem, edge to edge. | Measuring a little above the hem, where the sleeve is wider, or stretching a hem that has curled. |
| 6. Bottom hem width | Straight across the bottom edge, side seam to side seam. | Measuring a few centimetres above the edge instead of on it. |
| 7. Neck width (seam to seam) | Straight across the neck opening, from the neckband seam at one high point of the shoulder to the other. | Measuring to the outer edge of the rib instead of the seam, or pulling the rib open. |
| 8. Front neck drop (HPS) | From an imaginary line between the two high points of the shoulder, straight down to the neckband seam at centre front. The back neck drop is taken the same way at centre back. | Measuring at an angle from one shoulder. Lay a ruler across the two high points and measure straight down from it. |
HPS stands for high point of shoulder. Some charts call the same spot SNP, side neck point, and the contents list of ISO 18890 uses SNP in the names of some of its body length and front neck drop points. Whichever name a chart uses, body length and both neck drops start from it. Sleeve length does not: it starts at the shoulder point, where the sleeve is sewn on.
The extra points on a hoodie
A hoodie keeps the T-shirt's chest, shoulder and sleeve points and adds the parts a tee does not have: rib cuffs, a rib waistband, the hood and the kangaroo pocket. Two points also change. Body length runs from the high point of the shoulder, where the shoulder seam meets the hood, to the bottom edge of the waistband, so the rib is included. Sleeve length runs to the bottom edge of the cuff, cuff included.
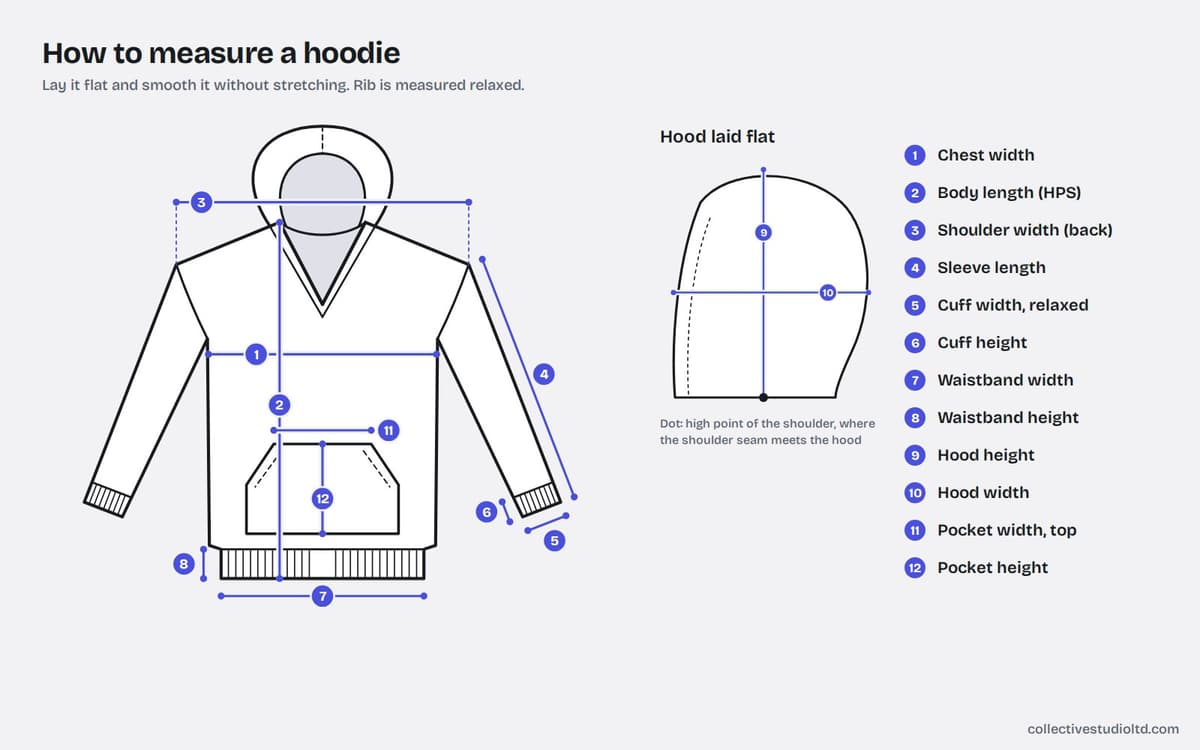
| Point | Where the tape starts and ends | The usual mistake | Our example, size M |
|---|---|---|---|
| 1. Chest width (2.5 cm below armhole) | Straight across from side seam to side seam, 2.5 cm below the bottom of the armhole. | Taking it in the armpit, as for pit to pit, when the chart names 2.5 cm below. | 63 cm, ± 1 |
| 2. Body length (HPS to hem) | From the high point of the shoulder, where the shoulder seam meets the hood, straight down to the bottom edge of the waistband. | Stopping at the seam above the waistband, which leaves the rib out. | 70 cm, ± 1 |
| 3. Shoulder width | Straight across the back from one shoulder point to the other. On a dropped shoulder, to the seam where the sleeve joins. | As on a tee: measuring to where the shoulder would be, not to the seam. | 58 cm, ± 1 |
| 4. Sleeve length (shoulder point to cuff edge) | From the shoulder point along the top fold of the sleeve to the bottom edge of the cuff, cuff included. | Stopping at the cuff seam. If your chart leaves the cuff out, say so. | 56 cm, ± 1 |
| 5. Cuff width, relaxed | Straight across the cuff at its bottom edge, laid flat and not stretched. | Stretching the rib open to the width of the sleeve. | 10 cm, ± 0.5 |
| 6. Cuff height | From the cuff seam to the bottom edge of the cuff. | Measuring a cuff that is folded back or rolled. | 7 cm, ± 0.5 |
| 7. Waistband width, relaxed | Straight across the bottom edge of the waistband, laid flat and not stretched. | Pulling the rib out to the width of the body. A relaxed waistband is often narrower than the chest on purpose, so the body blouses over it. | 55 cm, ± 1 |
| 8. Waistband height | From the waistband seam to the bottom edge of the waistband. | Measuring where the rib has rolled over. | 7 cm, ± 0.5 |
| 9. Hood height (HPS to top of hood) | With the hood laid flat, from the high point of the shoulder straight up to the top of the hood. | Measuring a hood that is folded or creased. A hood that is short pulls at the neck. | 36 cm, ± 1 |
| 10. Hood width | With the hood laid flat, across its widest point, from the front opening edge to the back of the hood. | Measuring across the face opening from the front, which is a different measurement. | 26 cm, ± 1 |
| 11. Pocket width at top | Straight across the top edge of the kangaroo pocket, from one side to the other. | Measuring along the bottom edge of the pocket instead of the top. | 30 cm, ± 0.5 |
| 12. Pocket height (at centre) | At centre front, from the bottom edge of the pocket to its top edge. | Measuring at the side, beside a pocket opening, rather than at centre front. | 21 cm, ± 0.5 |
Rib is measured relaxed because a stretched reading depends on how hard the person pulls, so two people get two numbers. ISO 18890 keeps measurements of a garment when extended in a separate annex. If you need a stretched figure too, such as how far a cuff opens over a hand, write it as its own point and label it extended.
Flat width or all the way round?
On a factory chart, a width taken across a tube of fabric, such as the chest, hem, sleeve opening, cuff or waistband, is a flat, half measurement unless the chart says otherwise. Double it to get the circumference: a chest of 58 cm flat is 116 cm round the garment, and a sleeve opening of 19.5 cm flat is 39 cm round. Shoulder width and neck width are straight distances across the garment, and lengths are measured once, so none of those is ever doubled. If a chart does not say which kind it is, lay a shirt you own flat and compare: a figure close to double your flat reading is a measurement taken round the garment or round the body.
Body measurements, garment measurements and ease
A body measurement is taken on a person; a garment measurement is taken on the clothing. They are different numbers for the same size. ISO 8559-1 defines how body measurements are taken, and ISO 8559-2 sets out a size designation system based on those body dimensions, so a size label built that way describes the body the garment is meant to fit, not the garment itself.
The difference between the two is ease, the room the pattern adds on top of the body. A tee that is 116 cm round the chest, worn by someone with a 100 cm chest, has 16 cm of ease. How much ease suits each fit, and how to work from a body chart to a flat chart, is covered in our guide to building a size chart.
Tolerances: what plus or minus means
A tolerance is the amount a finished garment may measure over or under the chart figure and still be accepted. A chest width of 58 cm with a tolerance of plus or minus 1 cm passes at any reading from 57 to 59 cm. Knitted fabric moves a little as it is cut and sewn, so no two pieces measure exactly the same, and a chart without tolerances leaves nothing agreed to judge a sample against.
No standard sets one tolerance for every point; the brand and the factory agree them. Our templates start from these, wider on long measurements and tighter on small ones:
| Tolerance in our templates | T-shirt points | Hoodie points |
|---|---|---|
| ± 1 cm | Chest width, body length, shoulder width, bottom hem width | Chest width, body length, shoulder width, armhole, sleeve length, waistband width, hood height, hood width |
| ± 0.5 cm | Armhole, bicep, sleeve length, sleeve opening, neck width, front neck drop | Bicep, cuff width, cuff height, waistband height, pocket width, pocket height |
| ± 0.3 cm | Back neck drop | None |
| ± 0.2 cm | Neckband width, hem depth | None |
How a factory checks the measurements
Measurements are checked on the sample first and again in bulk. The sample is made in the sample size, M in our templates, and every point is measured and compared with the chart. A reading inside the tolerance passes even if it is not the exact figure; a reading outside it becomes a correction in the next version of the tech pack, as our guide to making a tech pack explains. Once the pre-production sample is approved, it is sealed as the reference for bulk.
In bulk, pieces are measured in-line while the run is still on the machines. The final inspection then picks finished pieces at random from the packed cartons and measures them. How many it picks comes from AQL sampling tables, which our guide to AQL inspection explains.
Worked example: a size M T-shirt
These are the seven points of measure in the example in our free tech pack template, an oversized heavyweight T-shirt in 240 GSM combed cotton jersey for an invented brand. On our sewing floor a size M sample of it is laid flat, each point is measured as defined above, and a point passes if the reading lands inside the range in the last column.
| Point of measure | Where | M (cm) | M (in) | Tolerance (cm) | Passes between (cm) |
|---|---|---|---|---|---|
| Chest width (1 cm below armhole) | Side edge to side edge, 1 cm below the armhole | 58 | 22.8 | ± 1 | 57 to 59 |
| Body length (HPS to hem) | High point of the shoulder straight down to the hem edge | 71 | 28.0 | ± 1 | 70 to 72 |
| Shoulder width | Across the back, shoulder point to shoulder point | 53 | 20.9 | ± 1 | 52 to 54 |
| Sleeve length | Shoulder point along the top fold to the sleeve hem | 23 | 9.1 | ± 0.5 | 22.5 to 23.5 |
| Sleeve opening / cuff | Across the sleeve hem, edge to edge | 19.5 | 7.7 | ± 0.5 | 19 to 20 |
| Neck width | Across the neck opening at the high points of the shoulder, seam to seam | 19 | 7.5 | ± 0.5 | 18.5 to 19.5 |
| Bottom hem width | Across the bottom edge, side to side | 58 | 22.8 | ± 1 | 57 to 59 |
Three things show in the numbers. The chest and the hem are both 58 cm, so the body is cut straight, with no taper. The 53 cm shoulder is wide for a medium because the tee has a dropped shoulder: the shoulder seam sits down on the upper arm, so the shoulder width takes in part of the arm and the sleeve starts lower. And 58 cm flat is 116 cm round the chest. Our T-shirt tech pack template carries a classic-fit, set-in sleeve example for comparison: its size M has a 51 cm chest taken 2.5 cm below the armhole, a 45 cm shoulder, a 21 cm sleeve, a front neck drop of 9 cm and a back neck drop of 2 cm.
Turning measurements into a size chart
Measure one garment whose fit you like in your sample size, write those numbers in the M column, then grade the other sizes from it. In the example above the chest grows 2.5 cm a size and the body length 2 cm, so the S chest is 55.5 cm and the L is 60.5 cm. Choosing the grades and writing the chart customers see are covered in our guide to building a size chart, and what a tech pack is shows where the chart sits in the whole document.
To mark the points on your own drawing, our free T-shirt template and hoodie template give blank front and back outlines to print or trace.
Centimetres or inches
Measure in centimetres and keep one unit on the factory chart. An inch is defined as exactly 2.54 cm, so to get inches, divide the centimetre figure by 2.54: a 58 cm chest is 22.8 inches flat. Convert once, from the finished chart, rather than measuring some points in each unit. A tolerance of 1 cm is only about 0.4 inches, so rounding to the nearest half inch can use up most of it.
If you are having this made
Send us a tech pack, a size chart or simply a T-shirt or hoodie whose fit you like. If you send a garment, we measure it and build the pattern from those numbers. See our T-shirt manufacturing and hoodie manufacturing pages, or get in touch. Our minimum is 150 pieces per style and per colour.
Frequently asked questions
How do you measure a t-shirt?
Lay the T-shirt flat on a table, smooth it without stretching it, and use a soft tape measure. Measure the chest straight across from side edge to side edge just below the armholes, the body length from the high point of the shoulder, where the shoulder seam meets the neckband, straight down to the hem, and the sleeve from the shoulder seam along the top fold to the sleeve edge. For a tech pack, add the shoulder width across the back, the sleeve opening, the hem width, the neck width and the neck drop. The chest and hem widths measured flat are half the distance round the shirt.
What is pit to pit measurement?
Pit to pit is the chest width of a shirt measured flat, straight across from one side edge to the other just below the armpits. It is the term resellers use in online listings. A factory chart calls the same thing chest width and names exactly where it is taken, such as 1 cm or 2.5 cm below the bottom of the armhole, because the shirt can be a little wider or narrower a few centimetres down. Pit to pit is a half measurement, so double it for the chest all the way round: a shirt that is 56 cm pit to pit is 112 cm round the chest.
How do you measure the chest on a t-shirt?
Lay the shirt face up and smooth it flat. Run the tape straight across the front, from one side edge to the other, at a fixed distance below the bottom of the armholes: our general tech pack template uses 1 cm below, and our T-shirt and hoodie templates 2.5 cm. Keep the tape level and do not pull the fabric. The reading is the chest width, a half measurement. In the example in our tech pack template a size M is 58 cm flat, with a tolerance of plus or minus 1 cm, which is 116 cm round the garment.
How do you measure shirt length?
Measure from the high point of the shoulder, where the shoulder seam meets the neckband, straight down to the bottom edge of the hem, with the shirt laid flat and face up. This is body length from HPS, the length factories and tech packs use. Do not start at the centre back neck or the top of the collar, and do not run the tape down the side seam, because each of those gives a different number. On a hoodie the same line starts where the shoulder seam meets the hood and ends at the bottom edge of the waistband.
How do you measure a hoodie?
Lay the hoodie flat and face up, with the hood flat and any zip closed, and use a soft tape. Take the chest straight across 2.5 cm below the armholes, the body length from the high point of the shoulder to the bottom edge of the waistband, and the sleeve from the shoulder point to the bottom edge of the cuff, cuff included. Measure the cuffs and waistband relaxed, never stretched. For a tech pack, add the cuff and waistband heights, the hood height and width with the hood laid flat, and the kangaroo pocket's width at the top and height at centre front.
Are t-shirt measurements taken flat or all the way round?
On a factory chart, widths are taken flat, edge to edge, so the chest, hem, sleeve opening, cuff and waistband widths are each half the circumference. Double one to get the distance round: 58 cm flat is 116 cm round. Shoulder width, neck width and lengths are never doubled. Body charts are different, because they are measured round the person, not the shirt. If a size chart does not say which kind it is, lay a shirt you own flat and measure it: a chart figure close to double your flat reading is a measurement taken all the way round.
What does plus or minus mean on a size chart?
It is the tolerance: the amount a finished garment may measure over or under the chart figure and still be accepted. A chest of 58 cm plus or minus 1 cm passes at any reading from 57 to 59 cm. Knitted garments never come out exactly alike, so a factory checks each point against its tolerance rather than the exact figure. Our templates use 1 cm on long points such as chest, body length and shoulder width, 0.5 cm on smaller ones such as sleeve opening and neck width, and 0.2 to 0.3 cm on the smallest, such as the back neck drop and neckband width.
Where this applies
The manufacturing pages this guide relates to, if you are costing a real run.
Free tools & guides for this
Sources & further reading
- BSI: BS ISO 18890:2018, Clothing. Standard method of garment measurement (scope)
- DIN: ISO 18890:2018, Clothing, standard method of garment measurement, table of contents
- Estonian Centre for Standardisation: ISO 8559-1:2017, Size designation of clothes, Part 1: Anthropometric definitions for body measurement
- Estonian Centre for Standardisation: ISO 8559-2:2025, Size designation of clothes, Part 2: Primary and secondary dimension indicators
- US National Bureau of Standards: Commercial Standard CS33-43, Knit underwear (exclusive of rayon), second edition (1943, historical)
- NIST Office of Weights and Measures: SI units of length (the inch is exactly 25.4 mm)
Cite this guide
For journalists, writers, researchers and students.
Quoting this guide? Please credit Collective Studio and link to this page.
Reference
Homaira Jashim, Collective Studio. "How to Measure a T-Shirt and a Hoodie, the Way a Factory Does." 19 November 2026. https://collectivestudioltd.com/journal/how-to-measure-a-t-shirt
Writing about us? Our press kit has our facts, logos and photos, free to use with credit.
Have an idea? Let’s make it.
We manufacture from 150 pieces per style and colour, with organic cotton options from our GOTS-certified facility and photos at every stage. Send a sketch or a sentence — we’ll reply within one business day.